

|
Try before you buy: it's free
|
FastPictureViewer Professional 1.9 - Help & TutorialsLearn how to install and use FastPictureViewer. Discover advanced features. |
||||||||||||||
|
||||||||||||||
Help & TutorialsDownload
and print the
FastPictureViewer Professional Cheat Sheet to learn about
keyboard functions and shortcuts (PDF format)
Videos |
||||||||||||||
InstallationA short video demonstration showing the installation process, from downloading the installation package and saving it on your desktop to installing the program. |
||||||||||||||
RAW Viewing in Windows ExplorerThis video shows one of the additional benefits of installing FastPictureViewer: Windows Explorer automatically gains the ability to display RAW files from more than 320 digital cameras. |
||||||||||||||
User Interface Tour, Part 1Quick tour of the program's user interface, part 1: main screen, taskbar, menus, floating windows, recently used folders, basic navigation, histogram, EXIF, zooming in and out. |
||||||||||||||
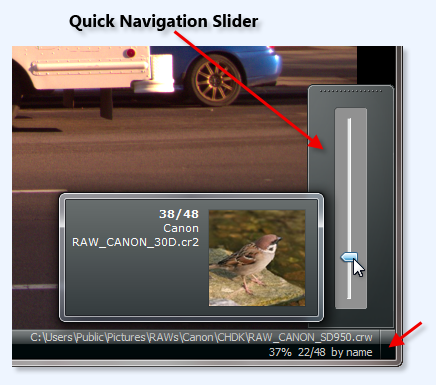
User Interface Tour, Part 2Quick tour of the program's user interface, part 2: taskbar jumplist, full-screen mode, auto-hiding taskbar, quick navigation slider, thumbnail strip (Windows 7 & Vista), mouse-wheel scrolling. |
||||||||||||||
Keep / Copy FunctionThis video demonstrates FastPictureViewer's simple file copy/move function when files are copied to a preset folder with a single keystroke. |
||||||||||||||
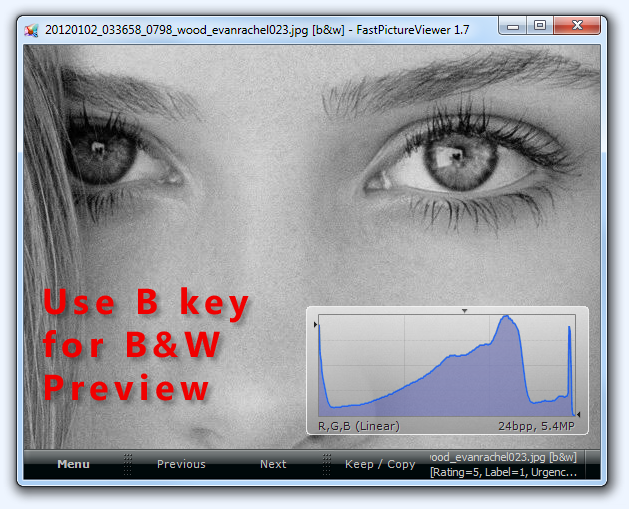
XMP Rating FunctionThis video demonstrates FastPictureViewer's industry-standard XMP rating function, which let users assign "stars" to their photos for easier sorting downstream. |
||||||||||||||
Installation Tutorial
Installation is mostly straightforward, after clicking the download link, you'll
be greeted by the standard Windows file download security warning user-interface
as follow:
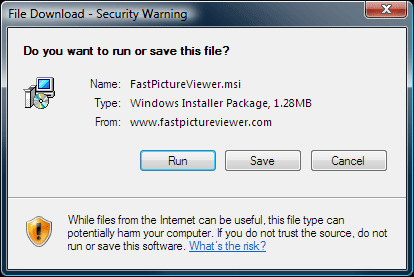 Click the Run button to start downloading the installation package. Alternatively, you can save it on your hard disk and run it later yourself, but this is not recommended, it's easier to run it right away. Moments later, you will be greeted by Internet Explorer's security warning dialog as follow: 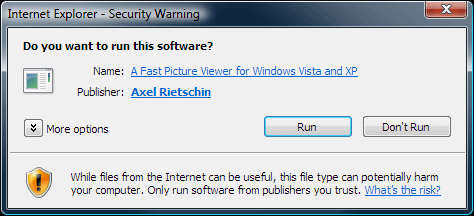 Again, click the Run button, this will start the installation procedure on your computer: 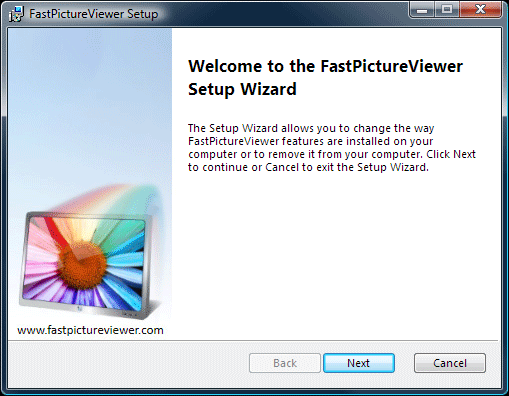 Click the Next button, read and agree with the terms of the End User License Agreement then click the Next button once again to display the installation customization page: 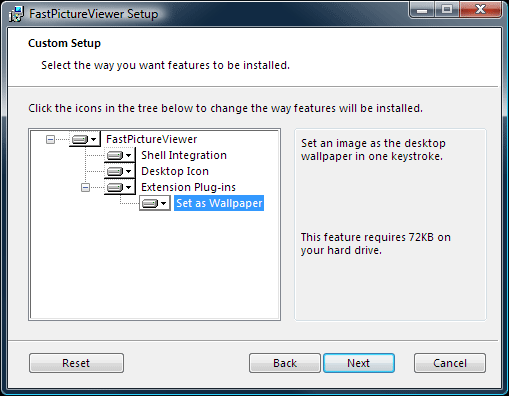 On this page you can opt-out (chose not to install) optional component by clicking on the little arrows on the left-hand side feature tree, once your selection is made (the default is to install everything) click the Next button to reach the summary page, then click Next one more time to begin the installation of the program on your computer: 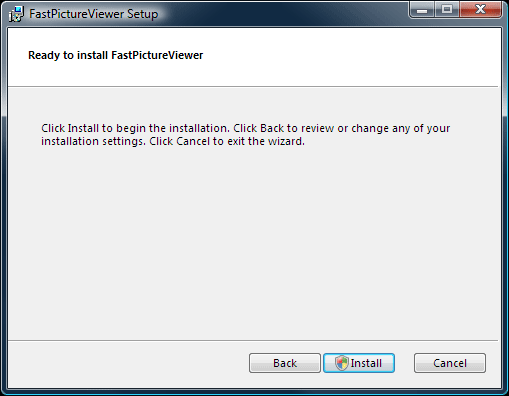 Windows Vista will ask permission at this point. If you don't have administrative rights on the computer, you will need to ask an administrator to help you install the program. When the installation is complete, you should reach the finish page: 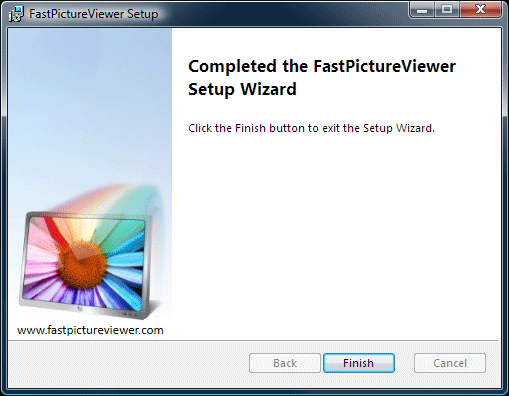 Click Finish and you are done. Congratulations! FastPictureViewer is now installed on your computer, you should find an icon on your desktop and a new entry on your start menu. Double click either one to start the program.  |
||||||||||||||
Getting Started with FastPictureViewer ProfessionalWelcome to FastPictureViewer! Please take the time to explore the "Getting Started" section, it's the best way to have a quick glimpse at the major feature of FPV Pro. As you will soon discover, there is a lot to see, so don't be fooled by the apparent simplicity of the user-interface: FPV Pro is a powerful and modern application, with lots of time-saving features!Do not miss the How To section of the user's forum for quick tips, shortcuts and information about specific functions of the program! FastPictureViewer Professional is a photographer-oriented image viewer: it offers features specific to photo viewing and photographer's workflows (as opposed to general-purpose image viewing). The program was initially created to facilitate the first review pass (aka "culling") that most photographers do on their fresh images to select the "keepers" from the rest (and sometimes delete unwanted images). The software also goes beyond this in its own, unique way. Read on... FastPictureViewer Professional (or FPV Pro for short) was designed primarily to...
To reach those goals, the program features...
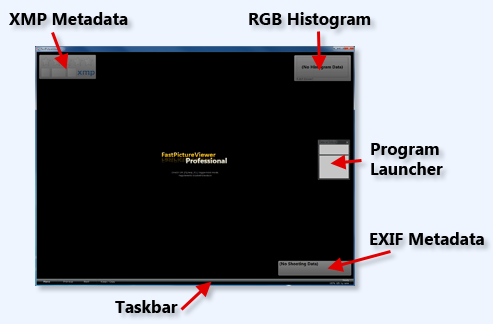
FPV Pro also support advanced functions such as tethered shooting, real-time folder monitoring and feature a simple slideshow mode. It can be used in many different scenarios and runs on a wide variety of hardware configurations, ranging from modest "netbooks" with small screens to multi-monitor, multi-processors 64-bit powerhouses. As examples, one of our customers at focusnature.ch told us he successfully culled 6'000 Canon EOS 7D raw files on a portable "netbook PC", in the back of a camping-car during a photo trip. At the other end of the spectrum, FPV Pro is used by many of iStockphoto' photo editors (the largest micro stock photo agency in the world) and help streamline their massive daily digital image reviewing tasks. The following section briefly describes the major features and functions of FPV Pro, beginning with a quick tour of the screen layout. When started for the first time, the program window covers the entire screen and is laid-out as follow:
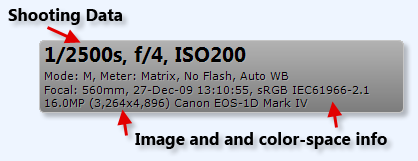
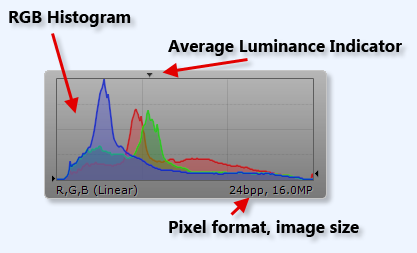
You'll notice the four floating windows, namely the XMP Metadata window, showing XMP rating, label and urgency (more on that later), the RGB Histogram window, the external Program Launcher window and the EXIF Metadata window, which displays shooting data such as shutter speed, aperture, date taken and more. The Taskbar can be found at the bottom of the main program window. The content of all these areas updates themselves automatically (and instantly) when images are displayed.
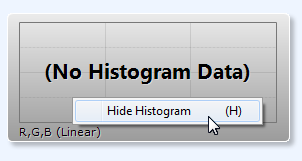
The floating windows and the taskbar can be left
visible or hidden: the Program
Launcher has a small "close box" that can be clicked to
close the window, the three floating windows can be closed by
right-clicking on their surface and
clicking Hide in the context menu, as illustrated below
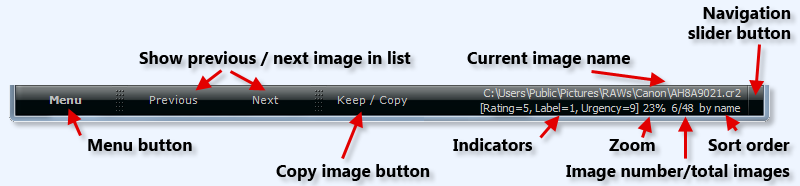
with the RGB Histogram window: Finally, the taskbar itself can be hidden by pressing the F12 function key (this feature is useful on netbooks, where the screen real estate is at premium). It is also possible to hide / show all floating windows at once by pressing the F10 function key. All window positions and states are remembered and automatically saved. The position and state of the main program window is also remembered between sessions, so if you resize the program to takes, say, the left half of your monitor, it will start with the same size and position the next time round. If you have multiple monitors, you can move the program's window (or any of the small floating windows) to any of your auxiliary monitors and all positions will be remembered too. One of the most important part of the user interface is the Taskbar, occupying the bottom of the program's window. The taskbar shows a wealth of information, as pictured below:
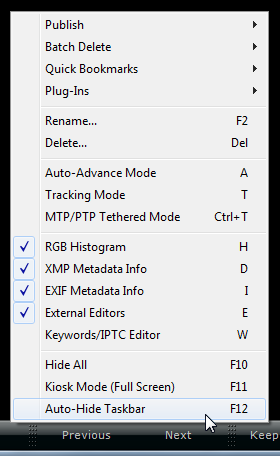
Another important feature to discover is the Taskbar Context Menu, that gets displayed by right-clicking on the taskbar itself:
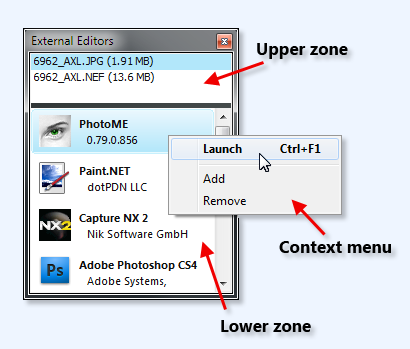
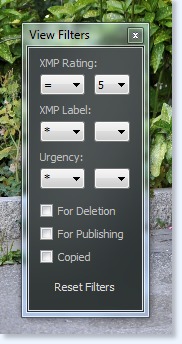
The Plug-In submenu gives you access to extended functionality added to the program in the form of separate add-ins, called "plug-in components". There is a plug-in that let you put the current image as desktop background (shortcut: Ctrl+W for Wallpaper). Another plug-in implements the very powerful batch file processor covered in another section on this page (shortcut: F for File utilities). In the next section one can find the Rename... (F2-key) command, which can be very simple - just type the new name and press Enter - or very sophisticated with powerful renaming templates and macro-substitution, allowing complex renaming schemes based on EXIF data, user name and many other data elements, such as dates and more. The Rename command is covered in details in its own section below. Delete... (Del-key) is a simple delete command. The user can chose to delete files immediately or to move them to the Recycle Bin (see the program preferences). Note that the program recognize the special RAW+JPEG shooting mode available on some top cameras, where two files are written for each picture taken: the raw file (NEF, CR2, SR2 etc, depending on the camera brand) and a JPEG file with the same base name. The program intelligently detects this condition and groups (or "stacks") the two files together and treat them as one image. The consequence if this special feature is that the program does not show every images twice, once the raw then the JPEG, as general-purpose viewers do. Instead, the program displays only one "photo" and treats the two underlying files as one for rename, delete, copy, rename and move operations. Auto-Advance (A-key) is a "poor man's slideshow" function which simple move forward through the image list at pre-defined time intervals according to the sort mode in effect. The speed can be configured in the program options from about 30 images per second (suitable for very fast computers and relatively small images) to 1 image per hour. The default rate is 1 image per second. The auto-advance mode is enabled/disabled by pressing the A key, while pressing Shift+A enters a variation of this mode where the program randomly selects the next image to display instead of always selecting the next in line. Any View Filters that might be in effect are observed. It should be noted that features like single-click zooming, panning, XMP rating from keyboard (1..5), flagging for deletion (X) etc works just fine in slideshow mode. Hitting the space bar while a slideshow is running will stop it. The Tracking Mode (T-key) is an advanced feature where the program monitors the current image folder and automatically displays the last incoming image. This function is invaluable in some scenarios, for example your camera might be uploading pictures to a folder on your computer using a Wi-Fi connection, and FastPictureViewer could be set up to display incoming pictures as they arrive: just open the folder into which the images are copied and press the T key to activate the tracking mode. This function also works like a charm combined with tethering software, for example with the Canon EOS Utility on Nikon's Camera Control Pro, just to name two, or to display incoming files sent to the local hard-disk over a network. The monitoring function works in real-time without consuming resources when idle, and instantly detects file arrivals anywhere in folder hierarchies of any depth, regardless of the number of images already present. The MTP/PTP Tethered Mode (Ctrl+T) is a function that let the program download and display images directly from your camera, through the USB2 connection, as they are shot. This feature relies on a special protocol, known as PTP/MTP (for Picture Transfer Protocol, or Media Transfer Protocol, respectively). This protocol is implemented by all current Nikon DSLR bodies and let FastPictureViewer Pro tether Nikon cameras directly, without any additional software, also in 64-bit. Your mileage may vary with other camera brands as some manufacturers (notably Canon) did not implement PTP fully yet, and disable camera controls when set in this mode, preventing the user to actuate the shutter (but there is hope, see the above paragraph about the tracking mode and manufacturer tethering software). The last five options on the taskbar context menu are self explanatory: they just toggle the corresponding floating window on and off. Note that the Keywords/IPTC editor is a planned feature and will appear in a future version: we plan to implement a dictionary-based keyword editor (aka "controlled vocabulary") and an IPTC editor letting users add IPTC-compliant title, caption, author and copyright metadata to their images. Below are illustrations of the XMP Metadata, EXIF Metadata and RGB Histogram photographer-specific information windows in action:
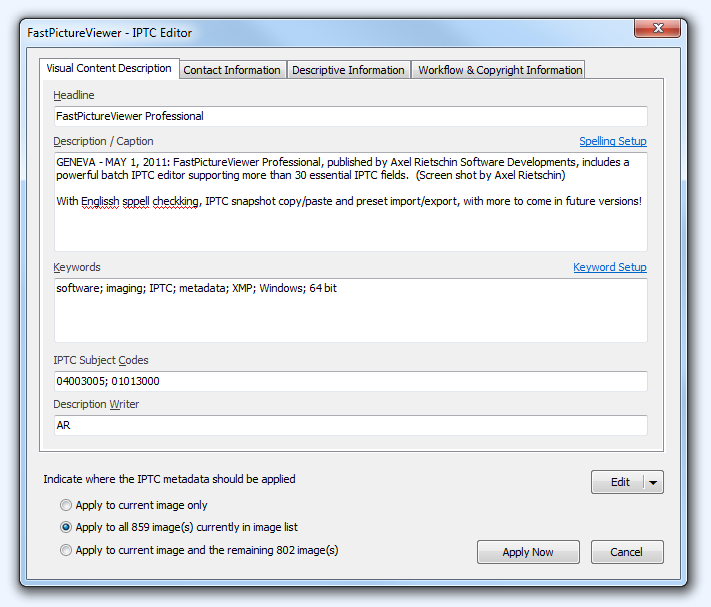
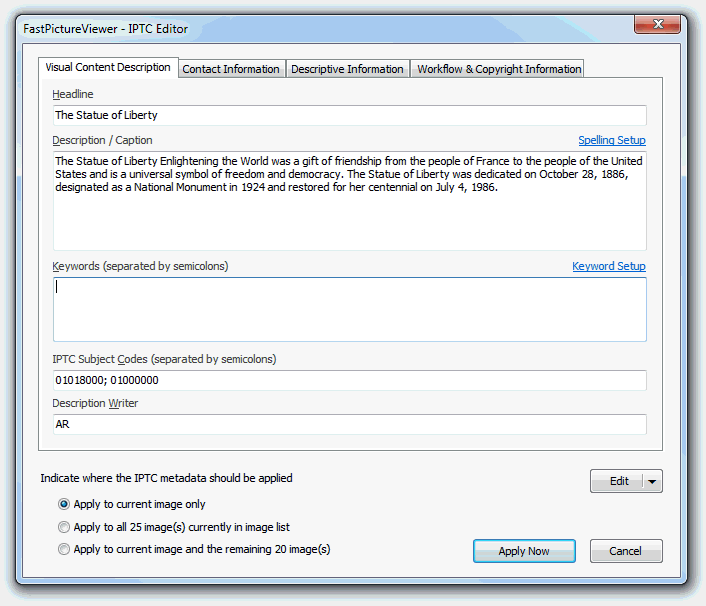
IPTC Editor with Assisted Keyword Entry and Reverse Geocoding
FastPictureViewer Professional includes a full-featured
IPTC Metadata Editor (W key) allowing users to tag images with keywords, copyright, author information,
location, rights usage terms, website addresses etc.
The editor currently supports reading and writing
more than 30 essential IPTC fields, with IPTC
snapshot support (copy/paste all IPTC fields at once
between images) and full preset import/export/quick
recall. FPV Pro uses the Adobe XMP metadata format
to store IPTC presets and as such our presets are
two-way interoperable between other IPTC and XMP
-enabled applications such as Nikon Capture NX and
Adobe Photoshop: seamlessly share IPTC presets
between your key applications! Our plug-in is also
able to import IPTC data from any IPTC-enabled file
formats: camera raw files, JPEGs, TIFFs, XMP
sidecars, even PDF's and Adobe InDesign INDD files.
This functions comes in the form of a plug-in, which is invoked by pressing the W key. The IPTC Editor plug-in is in Beta test form at the time of this writing, it has been extensively tested for interoperability with major IPTC-enabled applications from Nikon, Adobe and more. It supports reading and writing IMM and IPTC4XMP metadata, either to/from standard image file formats such as JPEG, TIFF or HD Photo, as well as reading/writing from and to external XMP-compatible sidecar files. The write mode (embedded, sidecars, or both) is governed by FastPictureViewer's XMP metadata preference options. The plug-in has the ability to apply IPTC data in batch to a whole set of files and features a spell-checker for most free-text fields (English-only at this time) as well as assisted entry for fields such as country codes, country name, IPTC Genre and a few other fields whose content has to come from standard reference data. The reference data bundled with the plugin comes straight from official sources such as the IPTC NewsCodes website. Taxonomies, Structured Keywords, Controlled Vocabularies: Keyword Entry in FastPictureViewerBelow is a short screencast demonstrating the
controlled vocabulary -based, assisted keyword entry feature of FastPictureViewer Professional. The program makes real-time suggestions as-you-type (it really works that fast, no cheating, we actually typed u, s, a quite slowly to allow you to see what's going on!)
 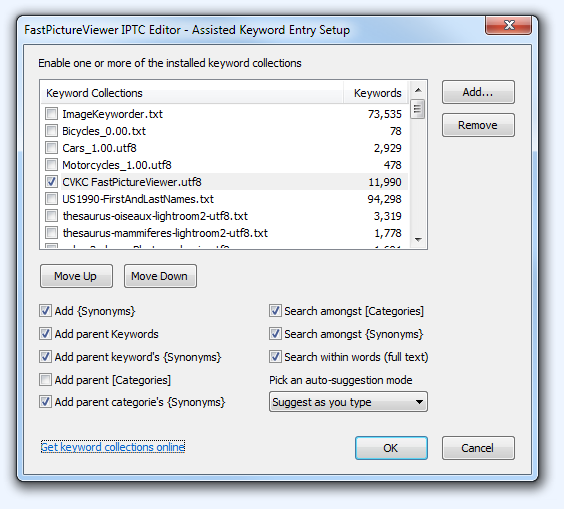 The current shipping version of our IPTC editor supports free-form keyword entry (keywords are also known as "tags"). Users can enter keywords such as sports, Hawaii, beach as a free-text list separated by either commas or semi-colons. Keywords can contain spaces and are stored in the appropriate standard IPTC data field, so they are recognized by all IPTC-enabled applications. Structured Keyword Collections: File Format DocumentationThe IPTC editor featured in FastPictureViewer Professional supports pre-defined keyword lists known as controlled vocabularies. Those keyword lists are useful when sharing pictures or submitting them to 3rd parties such as news agencies or photo libraries as they ensure "searchability" through the use of a standard and well defined set of keywords common to all parties. Predefined keyword lists also avoids typos which may prevent photo cataloguing software users to properly find the images later on. Keyword lists understood by FPV Pro are simple text files with one keyword per line. Those lists can be created and edited using any standard text editor, for example Windows Notepad. FastPictureViewer Professional supports most common text formats. Line endings must be consistent across the entire file: each line must end either with a single carriage-return (Mac-style text), a single line-feed (Unix-style text) or a carriage-return and line-feed (DOS/Windows-style text) but line endings must not be mixed in the same file. Commas (,), semi-colons (;) and pipes (|) are special keyword separator characters and must not be part of any keyword.
As a general rule, keywords are
usually just words (or names) but not phrases,
and should not contain punctuation, parentheses or
any special characters besides normal letters. For
example My 2011 holidays in Greece is not a good keyword, but
holidays and Greece both are,
while 2011 can be typed literally and does not need
to be a formal keyword in any predefined catalog. Below is a simple example of such a keyword list (a partial list of Swiss cantons): Bern Fribourg Genève Neuchâtel Valais Vaud Zürich Keyword lists can also be structured into hierarchies. For example the above are all cantons of Switzerland, so we could add some structure to our list by grouping them under the country's name, and indent the country's cantons by a single Tab character, normally invisible but symbolized once below using a small arrow sign (→). Please note that a Tab character is not the same thing as 8 blank spaces, so make sure your text editor uses real Tabs. Child keywords must be indented one more level than their parent.
Switzerland
→	Bern
	Fribourg
	Genève
	Neuchâtel
	Valais
	Vaud
	Zürich
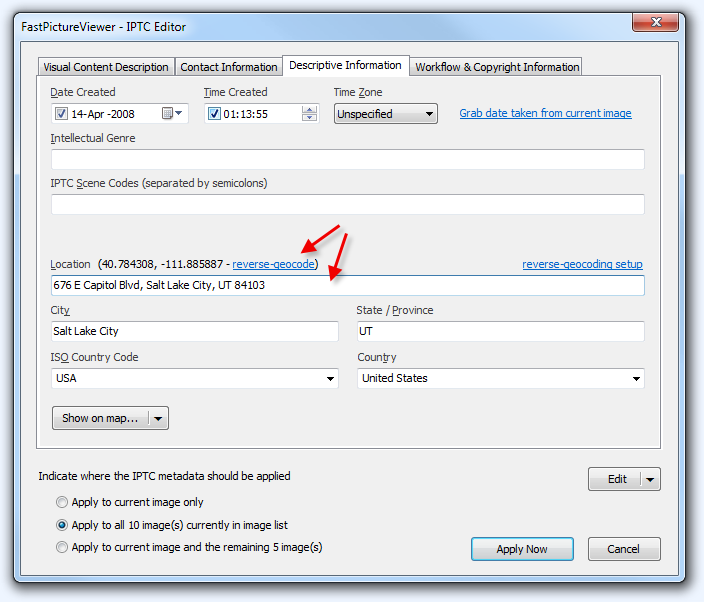
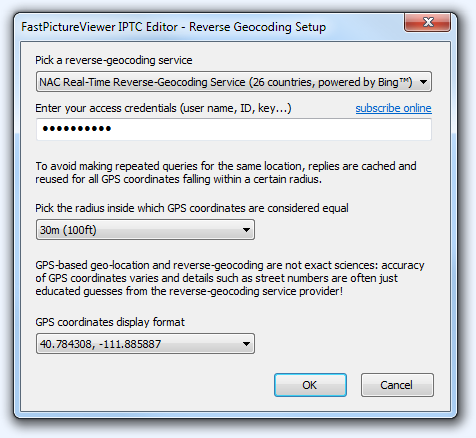
Of course keywords hierarchies can be structured more deeply, using more Tab indentation levels to describe the hierarchical relationships: Europe Switzerland Bern Fribourg Genève Carouge Chancy Cologny Plainpalais Neuchâtel Valais Vaud Zürich France Ain Haute-Savoie Paris Italy Lombardy Milan Americas North America Canada United States New York Rochester New York City Brooklyn Manhattan Lower Manhattan East Village Financial District Greenwich Village Lower-East Side West Village Queens Staten Island The Bronx California Los Angeles South America Brazil Rio de Janeiro Mexico Keyword hierarchies can be as tall and as deep as needed (within reason). It is easily conceivable that a vocabulary contains thousands of keywords, structured under hundreds of variously nested categories. The above are just arbitrary examples made for the sake of explaining the keyword list file format. Please do not "read" any meaning regarding the content of those examples. The point is that it's very easy to build your own taxonomy and bring some order to the "picture chaos" by tagging images with keywords picked from a well-defined set: all it takes is some planning and a simple text editor to build the dictionary. One important matter to discuss is the notion of synonyms, i.e. different words referring to the same concept. Sometimes a particular name has alternate spellings (for example Berne and Bern, or Genève and Geneva). Sometimes there are different ways of referring to the same thing, such as soccer and football, some other times a name can be expressed differently, like William and Bill. To enhance the keyword-based "searchability" of tagged images, it can be advantageous to also add synonyms to the image's keywords and to make this easier, synonyms can be added to the structured keyword list. Synonyms should be placed "under" the main keyword they refer to (i.e. indented one extra notch) and put into {curly braces} to mark them as synonyms and distinguish them from regular nested keywords. Below are simple examples, where synonyms are highlighted in bight {Yellow}: Americas North America Canada United States {USA} New York {NY} New York City {NYC} Names First Names Axel Elizabeth {Bess} {Beth} {Liz} Margaret {Maggie} {Peggie} Sydney {Sid} Victoria {Vicky} William {Bill} Explicit curly-braced synonyms gives FastPictureViewer a chance to be smarter when selecting keywords, for example synonyms can optionally be included automatically when tagging an image or may help find the proper keyword during entry. Synonyms cannot have children keywords (or synonyms) on their own, they are "leaf nodes" on the tree, in other words they lie at the end of a branch in the hierarchy. Keyword selection can also optionally include the parent keyword(s) in the hierarchy, for example when adding USA one may want to also want to add United States, North America and Americas to the tags of a particular photo, in other words the full path from the top-level down to the keyword or synonym. What is probably not wanted, however, is to add the First Names and Names parent keywords when entering the Elizabeth tag. To avoid this problem, the structured keyword list can include additional markers, namely [square brackets], to signal a parent keyword as a "non voting" structural element: [Names] [First Names] Axel Elizabeth {Bess} {Beth} {Liz} Margaret {Maggie} {Peggie} {Peggy} Sydney {Sid} Victoria {Vicky} William {Bill} From the above markup the program will known that Elizabeth is within the First Names category, which is itself within the Names category, and this knowledge can be put to good use when presenting and selecting keywords: in this example - entering the Elizabeth tag can include Elizabeth, Bess, Beth and Liz (assuming that automatic synonym insertion is enabled) but not First Names nor Names, which are just structural elements which should never be automatically entered as tags by themselves (of course nothing prevents users to type Names or First Names and use those words to tag a photo, if it makes sense). Categories should not have synonyms. The format described above is understood by FastPictureViewer Professional and this tab-indented text format is incidentally the same format as the one used by numerous digital asset managers on the market, one preeminent example being Adobe Lightroom. As such, FPV Pro can readily take advantage of existing structured keyword lists stored in this format, and custom taxonomies created by users or organizations can be shared across FPV Pro and other major applications. There are several source of readily available pre-made keyword taxonomies, some commercial and some free, covering general purpose tagging, as well as domain-specific tag collections covering areas such as geography, biology and more. The assisted keyword entry feature of FastPictureViewer Professional is flexible and powerful, offering several options letting users configure keyword catalogs, how to search and what gets automatically inserted (synonyms, parent keywords, etc). Reverse Geocoding (find addresses from GPS positions)More and more digital cameras are equipped with a GPS device that writes the position from which the picture was taken, along with a very accurate time stamp. This information can be used afterwards to "place pictures on a map". Less known is the fact that it is possible to retrieve the nearest street address from a GPS position, using specialized services known as reverse-geocoders. FastPictureViewer Professional features first-class support for reverse-geocoding in the IPTC editor. The program can call a reverse-geocoding service online to retrieve street-level addresses from GPS position and automatically full up the IPTC Location fields in one click.
FastPictureViewer Professional supports different reverse-geocoding services. Users must subscribe to one of the supported services and enter their access credentials in the appropriate configuration window. Reverse-geocoding providers covers different areas of the planet an have different terms of use and conditions, please refer to your service provider of choice for details.
To avoid making repeated queries for pictures taken from the same location to the online reverse-geocoding service provider (which may throttle requests and/or charge for them on a per-use basis), FastPictureViewer Professional features a "reverse-geocache" where service replies are stored locally, along with the corresponding GPS position, to avoid querying again for locations where the street address has already been retrieved. A preference setting let users configure what needs to be considered to be the same location as a radius. All picture taken within said radius will be assigned the same street address. The current reverse-geocoding feature, as introduced in FastPictureViewer Professional 1.5.204.0, supports reverse-geocoding on an image-per-image basis. A future version will add batch abilities to this particular feature, where the program will automatically query the local reverse-geocache (or the online service) for each pictures in the batch, automatically filling out the IPTC Location fields of many images in one click. Batch File Manager (File Utilities)FPV Pro features a very powerful rule-based batch file manager letting users create batch file management rules to copy/move/backup/rename/delete/export files automatically, in just a few clicks. The File Utilities plug-in is described in great details below. Image folders and sortingFastPictureViewer Professional was designed from the start to review entire folders of images and as such it behave a little differently than most existing image viewers, which were originally designed to view a single image at a time. In FPV Pro one start by opening a folder, not a file, and the program scans the entire folder and builds a list of all images it contains. By default, the program also scans all sub-folders contained within the image folder that was opened, and adds all images in all subfolders to the internal list too (it is possible to scan an entire drive or memory card at once). The folder scanning is very quick: on fast computers the program can easily discover more than 1000 images per second on local hard disks, so scanning a large folder containing thousands or even tens of thousands of photos only takes a few moments. The program builds a list of all images it discovered during the scan and sorts the list alphabetically by folder and file name. It is also possible to sort the image list according to the file modification dates, or from the EXIF "date time original" or the GPS time stamp data written by the cameras, if present. When sorting by time, the program will show images in perfect sequence, even when the files reside in different subfolders. This is invaluable when reviewing images taken by multiple shooters on the same event, when a time-based sequence is preferable over a shooter-based sequence. Top end professional cameras such as the latest Canon EOS 1D series and Nikon D3 series writes sub-second time information in the image metadata. FPV Pro reads such data and correctly sorts high frames-per-second sequences by time: images are shown in perfect chronological order down to the 1/100th of a second: one just have to make sure all cameras are perfectly time-synchronized before the event (Nikon D3 series cameras, for example, can set their internal clock from a GPS time source, making it easy to set multiple cameras to the exact same time) and FPV Pro will do the sorting for you. Real-time folder monitoringOne of the many unique features of FPV Pro is its always-on, real-time image folder monitoring: once a folder is loaded from a local drive, any photo added to the image folder afterwards (or any of its subfolders) will be automatically detected and added to the internal image list, at the correct location in the image sequence according to the sorting mode in effect. This means that it is possible to add photos to a folder in the middle of a viewing session and that the program will grab new images, without ever missing a single one, without the need to reload the entire folder from the top or even interrupt the viewing session. This feature is critical in some scenarios, for example when a picture editor reviews images dumped to his/her hard drive from memory cards or Wi-Fi connections across a local area network during an event: pictures are continuously added, and can be viewed in perfect chronological order, without interruptions. In auto-advance mode (aka slideshow) the program also grabs any newly added images on-the-fly and adds them to the running show. Once the first image is loaded, the program displays it in fit-to-window mode and awaits the user’s first command. It also silently prepares the next image in the background, so it’s ready to move forward in a snap when the user is. Modern DSLRs images are typically much larger than usual computer monitors, and reducing the size of a digital photograph to make it fit the screen tends to make it look sharper than it is. As such, it is essential to check for sharpness at 100% zoom, where each pixel of the image gets its own pixel on the monitor screen, also known at 1:1 display ratio. ZoomingFPV Pro has a unique spring-loaded zoom function that works very quickly: simply point the mouse cursor to an area of interest (for example the closest eye on a person’s portrait, or more generally on the region of the image supposed to be in focus) then click and hold the left mouse button. The program will instantly zoom to 100% level around the clicked area and will stay in zoom mode for as long as the mouse button is held down. The image can be panned by dragging the mouse, and the program returns to fit-to-window mode when the mouse button is released. When operating in GPU-accelerated mode, available with some graphic cards, the zooming and panning functions are instantaneous. Also unique is the program's ability to let the user change the current image, for example move to the next or previous image in line, while maintaining the current zoom and pan: when reviewing long sequences of high frame-per-second shots, common in sport shooting, it is possible to zoom and pan to some area on the first picture then to quickly move back and forth in the sequence, with the mouse wheel or keyboard, to compare sibling images and pick the sharpest or most decisive one. The program can be toggled to 100% zoom by pressing the Enter key (and pressing Enter again switches back to normal fit-to-window mode). The right-hand mouse button also controls a spring-loaded zoom function, whose ratio is configurable from 10% (that is, a reduction) to 25’600%, a massive pixel blow-up. By default the right-click zoom is set to 300%, as it is a popular magnification value according to some of our pro users. The program does not smooth pixels when blowing up beyond 100% as this would ruin the ability to assess sharpness. It is possible to change the right-click zoom ratio from the program's preferences, or by holding the Ctrl key while right-clicking, and scrolling the mouse wheel. This setting - like all others - is remembered by the program until changed, and the right-click zoom function can be disabled altogether in the options. It is also possible to enable pixel smoothing if desired, and to enable an auto-enlargement function that automatically scale-up small images to make them fit the window. On-demand raw conversionWhen previewing raw files, the program uses the embedded JPEG preview image created by the camera for faster display. On many cameras, the embedded JPEG is an accurate representation of the converted raw data, with all camera settings applied. Most recent high-end cameras store a full resolution JPEG representation of the raw data within their files, but on some models the manufacturer elected to store a smaller JPEG representation, typically 1/2 or 1/4 of the native size. FastPictureViewer Professional can be directed to perform a full raw conversion on those images if the user want to examine the image in full resolution. The raw conversion can be initiated by pressing the 'R' key on the keyboard. NavigationThe program offers several ways to move back and forth in the image list. Several keys are assigned to the same functions, in order to accommodate various user's preferences. For example one can move forward by hitting the Space bar, the Tab key, the PgDn key, the "+" sign on the numeric keypad, or by scrolling the mouse wheel. Users having multimedia keyboards will find that the "next" key also moves to the next image, finally it is possible to click the "Next" button on the program's taskbar. Similarly, one can move to the previous image by hitting the Backspace key, the "-" sign, Shift-Tab, PgUp, Shift-Space, the mouse wheel, the "previous" key on multimedia keyboards, of by clicking the "Prev" button on the taskbar. The Up arrow moves to the first image in the previous folder while the Down arrow moves to the first image in the next folded (when sorting by folder and file names). The Home key moves to the first image in the current folder, while the End key moves to the last image in the folder. Ctrl+Home and Ctrl+End moves to the first and last image in list, respectively. Ctrl+PgDn moves 10 images forward while Ctrl+PgUp moves 10 images backward. There is a preference setting to enable "wrapping" (automatic roll-back to the first image when reaching the end) and to suppress the "beep" sound that can be heard when moving past the last image in the list. As a side note, there is no limit on the number of images the program can detect and list. If sufficient computer resources are available loading a ridiculous number of images, say 300,000 at once, is not a problem and the program intelligently manages the image pool according to available memory, preloading and unloading images as needed.
The Getting Started guide is to be continued, please check back in a few days! The thumbnail strip (available on Windows 7 and Vista) will be covered, along with the basics of XMP rating. You can check the short videos in the meantime and the detailed description of several key features below. Do not hesitate to explore the program functions, also have a look at the numerous preference options: the program's behavior can be customized in numerous ways. FPV Pro is a mature and very stable application that can be used all day long, every day, as a reliable professional tool. Please read the rest of this page, there is plenty more to discover and check back from time to time as we expand the content! |
||||||||||||||
Using FastPictureViewer Professional with Adobe Lightroom (and other DAM's)
Adobe Lightroom is a great program to process,
organize, catalog and publish digital images and has
a very useful feature in the form of a Pick/Reject
flag that let users tag images quickly.
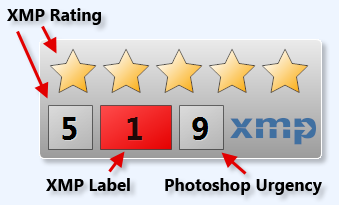
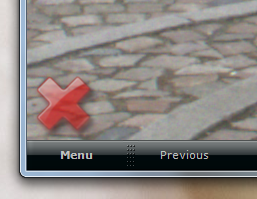
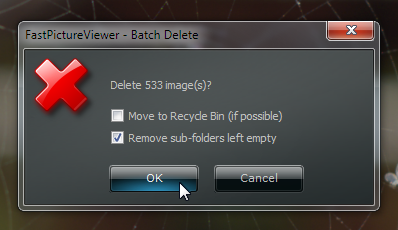
On the downside Lightroom (and other Digital Asset Managers) can be very slow to import new images: batch-importing thousands of raw images sometimes take hours and this is where FastPictureViewer Professional shines by letting users preview and rate raw files very, very quickly. This makes FPV Pro a perfect companion to Lightroom: the initial culling can be performed in FastPictureViewer quickly, and then the “keepers”, typically a few percent of all the images, can be imported into Lightroom for processing (raw conversion, adjustments, printing…). FPV Pro is compliant with the Adobe XMP metadata standard, meaning that Lightroom will read XMP Rating and Labels during image import, either embedded within the files (JPEG and TIFF formats) or written in separate XMP sidecars by FastPictureViewer. TIP: To make sure Adobe Lightroom detects JPEG and TIFF metadata changes made within the files (when FastPictureViewer is set to write metadata inside those files) the program must me set to update the Last Modification Date of the files, or LR will not detect the changes. The default behavior of FastPictureViewer is to preserve the file's date when rating them, so the sort order is not messed up, but there is a registry option that tells FPV to update the file modification date when the rating (or label, or urgency) was changed: go to HKEY_LOCAL_USER\SOFTWARE\ARSD\FastPictureViewer, locate (or create) a REG_DWORD value named UpdateLastWriteTimeWhenRating and set its value to 1. We'll soon add an easy-to-access option for that in the program's preferences. Other applications, such as IDImager/PhotoSupreme and Windows Explorer itself detects metadata changes automatically and don't need this option enabled. The drawback of enabling this option is that the sort order (when sorting by file modification date in FPV but also in Explorer etc) will no longer reflect the actual modification date of the image pixels, but the date of the last rating instead. Note that a Metadata Date field exists in the files, and is correctly updated by FPV each time a file is rated. Adobe Lightroom could use this field to detect metadata changes (should, actually) instead of relying on the file system's last modification date, but does not for some reason. One feature that does not "move" well across applications is the Lightroom Pick/Reject flag, which Adobe chose to implement as an internal, private flag and which is not imported or exported like the rest of the metadata. Why Adobe made this choice is anyone’s guess, but the fact is that even Adobe’s own Bridge software does not interoperate with Lightroom regarding the Pick/Reject flag, and as such there is no way for external application like FastPictureViewer to set this flag in a way that Lightroom will understand. Nevertheless, the Pick/Reject functionality is a great idea and below is how a similar scheme can be implemented within FastPictureViewer Professional (the idea being to tag certain images as “picks”, others images as “rejects”, then act on these conditions, for example by deleting the “rejects” and moving the “picks” to a different folder, ready for further processing). There are actually several ways to perform this kind of “yes/no” selection with FastPictureViewer. The simplest and most immediate is to use the Keep/Copy feature: the idea behind this function is to copy the “keepers” – those typically few images that are publication worthy – into a preset folder and leave the rest alone. Let’s say your pictures lands in a folder called “C:\Incoming”, copied there from your camera or memory card reader using Windows Explorer or some image import software. Browse the folder with FastPictureViewer and whenever you see an image worth keeping, press the Keep/Copy button on the program’s taskbar, or hit the K key on your keyboard (users of full-size 102 keys desktop keyboards can also use the “*” key on the numeric keypad. The middle mouse button, if available, is wired to the same function). The program will then ask where you want to copy the file: pick a destination folder and your image will be copied there. On subsequent use of the Keep/Copy function within the current viewing session, the program will simply add the image(s) to the same folder. All you have to do when you are done is import the keepers into Lightroom from the keep/copy folder that you selected, and which contains all the image that were “picked” during the viewing session. FastPictureViewer can also move the images instead of copying them: simply press and hold the [Alt] key when using the Keep/Copy command. Some users prefer to tag images instead of just copy or move them to different folders. Both methods are equally valid and which one is best is strictly a matter of personal preferences and work habits. There are two kinds of tagging available in FastPictureViewer. The first is in the form of “flags” that can be set on some pictures, which later allows you to act on the flagged images: the simplest example of this is the “Mark for Deletion” flag, which is toggled using the “X” key on the keyboard. As you browse images, press the “X” key on those pictures that you don’t want to keep (for example, blurry ones, or redundant ones). The “X” key does not delete the image right away but simple “flags” it for deletion. Pressing the “X” key again removes the flag, and the state of the deletion flag is displayed on the lower left corner of the program’s window, in the form of a red “X” mark overlaid on the picture. When you are done reviewing and X-tagging your photos, press Ctrl+X to delete all images marked for deletion in one shot (the program will ask for confirmation). You can combine the use of the Keep/Copy function and the batch delete function just described to implement a simple file management workflow: the keepers are copied (or moved) to a specific folder, and the rejects are deleted. Or you could just flag all "rejects" for deletion and consider everything else as keepers, as you see fit. Another flag that can be set on the images is the “Mark for Publishing” flag ("P" key). This flag can be used to mark images for publishing to a website or an FTP server. There is no web or FTP upload plug-in available for FastPictureViewer at this time, but the "P" flag can still be used to mark images for further action (more on this later). One thing about flags like “X” and “P” is that they are internal to FastPictureViewer and does not “persist” across viewing sessions (they are said to be "transient" flags). The program does not maintain a database where to store those values and they cannot be stored within the image files themselves, thus the program “forgets” about the flag's states when you exit, users need to take advantage of those flags within the current viewing session (note that, incidentally, Lightroom 3 uses "P" and "X" for pick and reject...). The second kind of tagging available in FastPictureViewer is in the form of XMP metadata. “Metadata” literally means “data about data” and XMP is an Adobe-initiated industry standard for metadata interoperability, which let compliant applications store and exchange information such as rating and labels, or copyright information (among other things: some applications even store image processing instructions and program settings as XMP metadata, for example Lightroom and Adobe Camera Raw, just to name two, store pretty much every information about the image in the form of XMP metadata). FastPictureViewer Professional reads and writes three specific XMP metadata elements, namely the XMP Rating, a value from 1 to 5 used to rate pictures from 1 to 5 stars, the XMP Label and the Photoshop Urgency, whose meanings are up to the user. The XMP metadata can be stored within the image themselves or in small separate files known as “XMP Sidecars”. FastPictureViewer can read and write metadata within image files on standard image formats (JPEG, TIFF and HD Photo) and to and from XMP sidecars for all other formats, such as Canon CR2, Nikon NEF or Adobe DNG, among others. Users can take advantage of FastPictureViewer Professionals’ rating and tagging system to implement their own image classification convention. For example the XMP Rating is used to set a subjective appreciation of the images (5 stars = outstanding, 4 stars = great, etc.) while the XMP Label can be used independently to tag the image in another “direction”, for example a Label of 1 might mean “for review”, a Label of 2 might mean “reviewed” etc. Finally, the Photoshop Urgency flag can be used for a 3rd meaning, independent of the other two. The XMP metadata is stored within images (or in sidecars next to them) and as such “moves” across XMP compliant applications: Lightroom will read FastPictureViewer’s ratings when importing pictures, and FastPictureViewer will read ratings written within image files or in sidecars by Lightroom or any XMP compliant application. You are free to implement your own Pick/Reject policy using one of the three aforementioned XMP flags: it could be as simple as declaring that 4 and 5 stars are “picks”, 2 and 3 stars are “maybes”, 1 star means “reject” and no star means "not reviewed yet". The key word is "declaring" : the actual meaning of the values is entirely user-defined, you just decide what they mean to you (this is especially true of the XMP Label and the Photoshop Urgency). Another possible way would be to use the XMP Label instead of the Rating, and declare that a Label of 1 means “pick” while a label of 2 means “reject”, or perhaps 1 = pick, 2 = maybe and 3 = reject, or any other convention that makes sense to you. There is no general convention about the use of the XMP Labels, so it’s up to the user to decide what value to use for what meaning. XMP compliant applications will maintain this value, display it and let users change it, but will generally not interpret it in any way other than letting users filter images on those values. They are just user-defined values with user-defined meanings, the same goes for the Photoshop Urgency flag: it’s entirely up to the user to decide its meaning and how to interpret it. To ensure that Lightroom reads XMP color labels written by FPV Pro properly, make sure they are set to default Lightroom values, namely “Red”, “Yellow”, “Green”, “Blue” and “Purple” within Lightroom itself. Those labels are just text, there is no general convention about their use and they must match exactly (lexicographically) across applications (like LR, Bridge, FPV Pro...) to ensure smooth interoperability. When the XMP rating is enabled, FastPictureViewer Professional offers the option to automatically advance to the next image when an image is rated or flagged for deletion (See Options->XMP Rating->Automatically move to the next image after rating). With this option enabled, hitting "5" will assign a rating of 5 stars to the current image and jump to the next image in line right away. This makes it even faster to review and rate pictures! The "X" key (Mark for Deletion) is also tied to this automatic advance feature: users can simply press X, or 1 to 5, to reject or rate images, and the program automatically displays the next image after the key pressed, there is no need to manually advance to the next photo. The "P" key (Mark for Publishing) is not subject to the auto-advance function, so it's possible to "pick" the image by pressing "P", then rate it by pressing, for example, "4" and the program will only move forward after the rating was given. Once images are tagged, either using the two transient “X” and “P” flags or one or more of the three persistent XMP values described above, users can take advantage of the FastPictureViewer File Utilities plug-in (a powerful rule-based batch file processor) to act on files according to a number of condition, including the state of the five flags mentioned above. Users can create file management rules to copy, move, delete or export files tagged with certain values, for example if would be easy to copy all files rated 4 stars or more, and having a Label value of 1, to a given folder. Actually, point-and-click rules can be created to act on files using any combination of conditions, including but not limited to the state of the “X” and “P” flags, and the XMP Rating, XMP Label and Photoshop Urgency but also on EXIF data, dates, file size etc. It is also possible to create several rules and run them all at once to perform simple or complex tasks. Once set up, a group of rules can be recalled and applied in a couple of clicks, making it easy to fully automate a complex workflows: for example “rejects” could be moved to some “Rejects” folder, “picks” could be copied to a “Picks” folder and a web-ready copy of each picks could be exported in JPEG format, while the “maybes” could be moved to yet another place if your workflow requires it. The batch processor uses parallelism on suitable computers (those with multiple cores or multiple processors) so it runs very quickly. Once dispatched by the File Utilities plug-in, it becomes easy to import the “keepers” in Lightroom (or any other Digital Asset Manager), also knowing that any XMP metadata set in FastPictureViewer, for example the XMP Rating, will move along and be imported with the pictures. |
||||||||||||||
XMP Labels inter-operability with other XMP-enabled applications
XMP Labels are great to tag your files and make it easier to sort or retrieve them later within your Digital Asset Manager.
One small drawback is there is no established standards telling how to name XMP Labels. They can be any text, in any language. Some applications have defined default conventions, for example Adobe Lightroom uses text labels such as Red, Yellow, Green, Blue and Purple by default.
This text gets written in the metadata within the files or in XMP sidecars. FastPictureViewer knows about the Lightroom labeling convention (and a few others) and thus can read and write those labels perfectly. However, nothing prevent the user to rename their labels to something else, for example someone might prefer "Urgent" instead of "Red" and change the label's text within his Digital Asset Manager application (LR, IDimager, iMatch all allow for label customization). The only problem is that, with custom labels written as-is as text within files, and given that no convention exists regarding how to name the labels besides the default settings of the applications, a compatibility problem arises: suppose that a user speaks German and that the German version of his DAM writes label in German languages, e.g. Rot for Red, Gelb for Yellow, Blau for Blue etc. Those labels will work fine if the same application reads the files, but if another application - following another convention - attempts to read the metadata, it will likely not be able to make sense of the labels. The end-user is responsible to pick a common labeling scheme that works across all the applications he or she uses, and make sure the labels are consistently set in all those application or chaos will follow. When working within an organization, or when exchanging files with others, it is crucially important that a consistent labeling convention is established across all involved parties. Sometimes, existing files have different conventions and it is necessary to provide a translation mechanism to interpret the label values. In FastPictureViewer Professional this mechanism is implemented through simple translation tables stored in plain text files. As an example, to convert German-language labels when reading metadata, a file called ReadConversion.txt can be created with the following content: Rot=Red Gelb=Yellow Grün=Green Blau=Blue Lila=Purple With the above translation table, files contain German language color labels as XMP Label values will be properly interpreted. Conversely, a WriteConversion.txt file can be created, for example with the following content: Red=Rot Yellow=Gelb Green=Grün Blue=Blau Purple=Lila With the above write translation table, FastPictureViewer will write "Rot" into red-labeled files etc. Those files are stored on disk in a folder called XMP Label Conversion and this folder can be accessed easily from your start menu: look for a 'FastPictureViewer Data Files' shortcut in the FastPictureViewer folder of your Start menu. This folder typically is located at C:\ProgramData\FastPictureViewer on Windows 7 or Windows 8.x. Most advanced DAM software allows for customization of the XMP Labels, sometimes through a used-interface dialog or through configuration files. We chose the configuration file way for a number of reasons. First it's trivially easy to edit a text file with Notepad. Next the file-based approach allows for more flexibility: suppose you have a mix of German-labeled files and other files following different conventions as well, such as Urgent instead of Red. With our configuration file based approach is is trivial to map several input value to one color, as follow, in ReadConversion.txt: Rot=Red Rosso=Red Rojo=Red 红色=Red Urgent=Red Blau=Blue Blu=Blue etc... Mapping several different input values to one internal value may prove challenging in a classic user interface while it's trivially easy when editing a text file directly. Omitted colors are left un-translated. Mapping is case-insensitive. The translation tables described above can translate labels written in any language and alphabet to the internal "English colors" labels, as well as write out labels in any language or alphabet (if you use Notepad, just make sure to save the files in UTF-8 if you use non-Roman characters: click Save As and change the Encoding from ANSI to UTF-8 to preserve all international characters). Labels read and written out can contain spaces if desired (but leading and trailing spaces are trimmed). |
||||||||||||||
File Renaming Tutorial
FastPictureViewer supports simple renaming of image stacks. By pressing the standard
"rename" shortcut (F2), the user is presented with a dialog window where the name
of the current image can be edited:
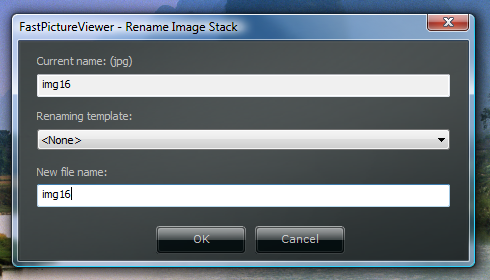 The current image name (without extension) is shown in the top field, while the bottom field let the user modify the file name. Pressing the [Enter] key or the [OK] button dismisses the dialog window and causes the file to be renamed. When acting on image stacks (such as RAW+JPEG in FastPictureViewer Professional) all the related files are also renamed , i.e. the if the current image is composed of a stack of three files, say DSC_0001.NEF, DSC_0001.JPG and perhaps also DSC_0001.XMP if an XMP sidecar was created, the program will rename all three files automatically. On Windows Vista or later, the rename operation is carried in a way that guarantee that all three files are renamed together (or none are) even in the advent of a software error or computer crash: this ensures perfect consistency and robustness of the renaming operations. FastPictureViewer Professional also supports advanced renaming through templates. A renaming template is a "formula" that tells the program how to transform the name: it can be seen as a rule. Examples of rules includes adding a date prefix to the file name, or the photographer's name. When renaming using a preset template, the program performs the transformation according to the selected rule and let the user edit the final name, just as described above. The renaming templates to be used is selected from the middle field in the above screen shot. Clicking on the field with the mouse will display a list of available templates, then clicking on a template name will select it. The transformation is then applied to the current name and the New file name field (at the bottom) is updated with the newly transformed name, which can be further edited by the user if desired. Advanced: creating and editing custom renaming templates (walkthrough) A specialized template editor has been included to facilitate the creation of renaming templates. It is possible to create any number of templates (within reason) and templates can perform virtually any imaginable name transformations. Transformations also includes the insertion of predefined variables such as date, time, image information etc. The template editor is invoked by selecting the <Edit Templates...> item in the template list: 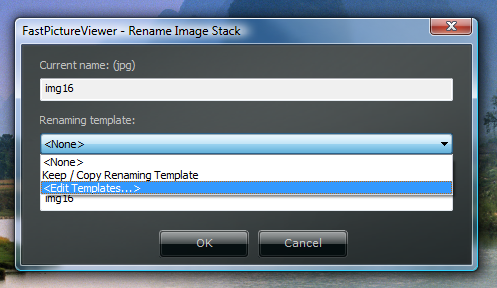 There is always one pre-defined template (which can be edited but not removed), called "Keep / Copy Renaming Template", which is used - as it's name indicates - for renaming files during copy operations, if such option is enabled in the program preferences, on the File Operations page. The template editor initially looks as follow: 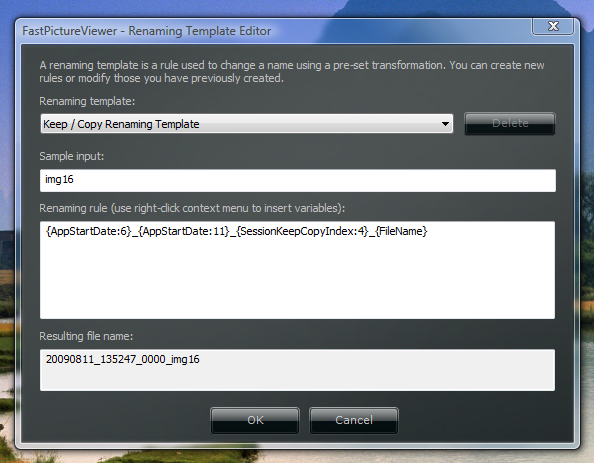 The only existing template is selected. Let's explain the above screen in more details: at the top, a list of existing templates is shown in a drop-down list. This is were the template to be edited is selected. This list also contains a special <New...> item which is used to create a new template, which we shall do shortly. Below the template list an edit fields let the user type a sample file name, to make it easy to see the result of the transformation on various names. This field initially contains the name of the image currently selected in FastPictureViewer but you can type pretty much anything in there. The middle section of the screen contains a large edit fields with the renaming rule. In the example above we see four fields, delimited by curly braces: first there is the {AppStartDate:6} field, which represents the date/time at which the program was launched, formatted as YYYYMMDD as indicated by the format specifier 6, followed by an underscore then by the same field with a different format specifier, 11, which means "time" in HHMMSS format. After a second underscore one can see the {SessionKeepCopyIndex:4} field, a 4-digit counter representing the number of images that were copied during the current program session, then finally a third underscore and the {FileName} field, which represents the original file name. The result can be seen in the bottom field of the window, which pictures the sample input transformed by the rule. It is possible to type additional text in the rule (the underscores are examples of additional text, but you could add any fixed prefix or suffix - just make sure that the text you enter is suitable for a file name, i.e. does not contain illegal characters such as slashes, colons, question marks, asterisks, angle brackets etc). Let's create our own custom rule: first, click the Renaming template list control and select the <New...> item. A small window will open where you can type the name of the new template. The name can be pretty much anything and is stored alphabetically by the program (note that templates are stored per-user). 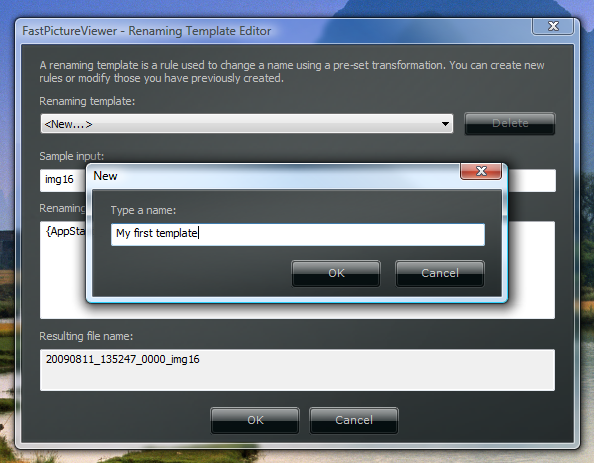 Click [OK] after typing the name. You will return to the template editor with the new template selected. Initially, the renaming rule only contains the {FileName} field, meaning that it does not do much: the resulting name is simply the input file name inserted verbatim. The renaming rule field is a standard text editor control and as such has a context menu (activated by right-clicking within the editor area). The standard context menu contains the usual copy/paste/undo actions but was customized to facilitate the insertion of predefined variables such as the ones described above. Variables are regrouped in several categories including image information, file information etc. In this example we'll modify the template to insert the current Windows user name at the beginning of the file name. First, let's click at the insertion point (just before the {FileName} field), then open the context menu by clicking the right-hand mouse button. The field we are interested in, {WindowsUserName}, is located in the Miscellaneous submenu: 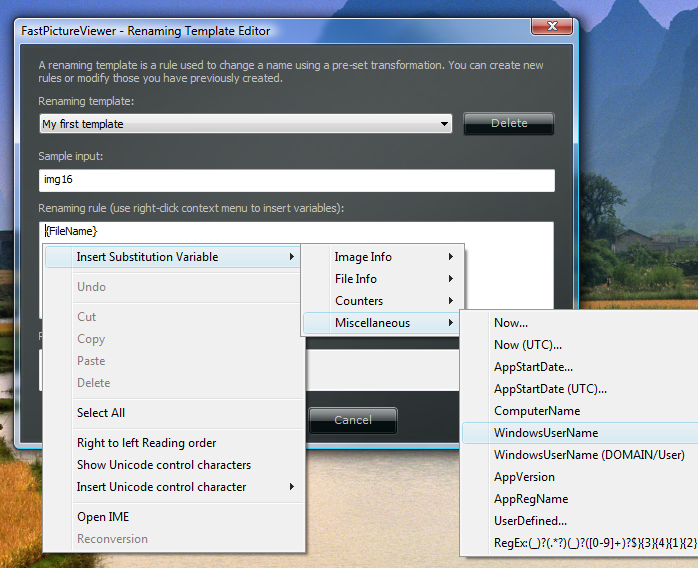 We want a separator between the user's name and the file name, so let's type a dash so the renaming rule becomes {WindowsUserName}-{FileName}. As you can see, the resulting file name now reflects the change made to the rule: the currently logged user name followed by a dash, then the original file name, as now shows in the result window: 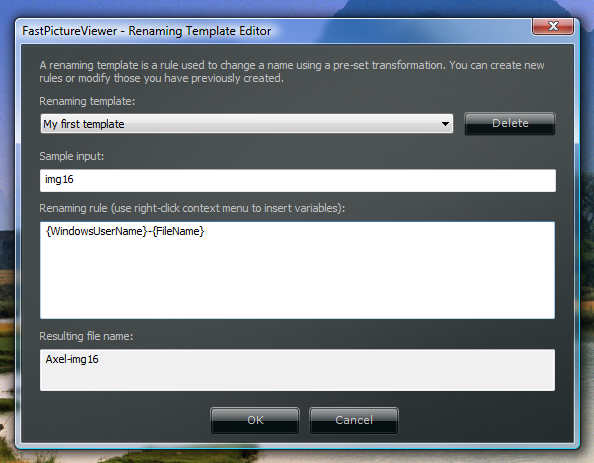 Clicking [OK] dismisses the template editor and reverts to the rename dialog, with our new template selected. The program remembers which template was last used so simply pressing F2 in the future will open the rename dialog with the last selected custom template already applied: 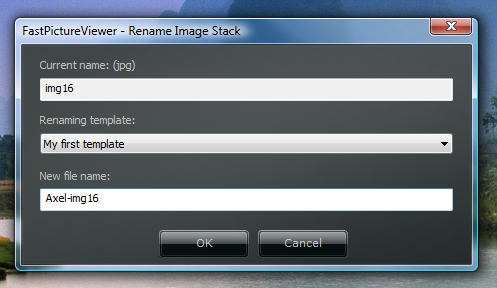 This conclude this simple walkthrough. There are dozens of pre-defined variables ready to be inserted in your templates, including EXIF information, file dates and times and numerous other fields. For expert users the program also provides a regular expression field (that can be found in the miscellaneous sub-menu). Regular expression allows to split a name into various components then join the components back into a different order, or with fields inserted in between. The simplest example is to transform a name in the form _DSC0001.JPG into DSC_0001.JPG, something that simply cannot be done using usual renaming techniques: a regular expression can split the name into its three parts, the underscore, the "DSC" part and the 4-digits number using capture groups. The parts can then be rearranged to reform the new name. The regular expression engine used by FastPictureViewer follows the C++ TR1 ECMAScript regex syntax, who's documentation can be read here. The {FileHash} variable is substituted by the file content's hash (MD5) while {FileHash:1} and {FileHash:2} represents SHA1 and SHA-256 cryptographically secure hashes, respectively. |
||||||||||||||
Tethered Shooting Tutorial
Tethered shooting refers to a technique involving a digital camera connected to
a personal computer through an USB cable. The photographer uses his/her camera normally,
and the images are transferred to the PC to be displayed in full screen moments
later. This is great for studio work, where the photographer or customer can judge
and rate the images right as they are shot, with the viewing comfort provided by
the large PC screen and FastPictureViewer's instant zooming and panning functions.
As an added benefit, images are also automatically backed-up on the PC moments after
being taken. Another great application is to shoot tethered and broadcast the images
on a large screen using an LCD projector, great for public events, demos or seminars.
How does it work? Tethered mode relies on a protocol known as the Picture Transfer Protocol, or PTP for short. This protocol has been standardized in 2005 as ISO 15740 and is now supported by most modern DSLR cameras. Notable exceptions are the Nikon D1-series (D1/D1H/D1X) and some Canon cameras which came out before the protocol was created (users of Nikon D1-series and Canon cameras can use manufacturer-provided software to tether their camera, FastPictureViewer can then be used as full-screen viewer, thanks to its built-in folder monitoring function - [T key], where the program automatically displays the last file added to the monitored folder). How to set up tethered shooting? The first step to setup for tethered shooting is to set the camera in PTP mode (as opposed to Mass Storage mode). This is usually done through the camera's menus, for example on Nikon D2 and D3-series camera, the option is under MENU->SETUP MENU->USB. Some recent Nikon cameras, notably the D700 and D90, only operate in PTP mode, so there is no need to set any option. If you have never used PTP with your camera before, you need to let Windows recognize your device first. The simplest way to do so is as follow: turn the camera OFF, then plug the USB cable in the camera on one side, and in an empty USB 2.0 port on the computer (you can also connect through an USB "hub" but for the first time it's probably better to plug the camera directly in one of the computer's USB 2.0 port). You could use tethered shooting with older USB 1.0 ports but transfer speed will suffer drastically, so it is recommended to use a USB 2.0 port and USB 2.0 compatible cable, such as the one that came bundled with your camera. Once the cable is securely connected on both ends, just turn the camera ON. After a short while, Windows should detect your camera and proceed with the automatic installation and configuration, you don't have to do anything but wait a few seconds until Windows tells you that the device is ready to use. From there, just verify that you can access the camera from Windows Explorer: open an Explorer window, for example "My Computer" on Windows XP or "Computer" on Windows Vista or later. You should see a section called "Scanners and Cameras" (XP) or "Devices" (Vista) towards the bottom of the Explorer window, with your camera's model name under a camera icon. This is indicating that Windows has "seen" your camera and is ready to communicate. Now test the "plug and play" connectivity by turning the camera OFF: you should see the icon disappear. Turn it back ON and the icon will reappear after a few seconds, confirming that everything is working as it should. Turn the camera OFF. You are now ready to go. Start FastPictureViewer Professional, click the Menu->Images Folder to tell the program where you want to save the images, then activate the tethering function using one of the following two ways: either press Ctrl+T on your keyboard (by pressing and holding the [Ctrl] key, then simultaneously pressing the letter [T]), or use the mouse and right-click the task-bar at the bottom of FastPictureViewer's window. A popup menu will show up, click "MTP/PTP Tethered Mode" on that menu. The status message at the lower-right corner of the window should display "[Waiting for MTP/PTP]", indicating that the program is looking for a camera to connect to. Turn the camera ON at this point. After a few seconds, the program will display the model name of your camera, for example if using a Nikon D3, the program will display "[D3]" in place of the "[Waiting for MTP/PTP]" message, indicating that FastPictureViewer is now connected to the camera. If you take a picture now, the program will download it to the computer and store it in the image folder that you selected previously. If you forgot to select an image folder, the program will ask you at this time by popping up the folder selection dialog (note that you can create a new folder directly from this dialog, just navigate to the place where you want to create the new folder, then click the "Make New Folder" button once and wait. After a second or two a new folder will be created with a default name of "New Folder". Just type in the name you want to use, for example the name of the shooting session, date, or whatever name you want to use, then click the OK button on the dialog window). Take a few more pictures, you should see them appear in FastPictureViewer moments later. You will notice a certain delay between the moment the picture is taken and the moment it's displayed in FastPictureViewer on the computer. This delay, or lag, depends on several things, including the shooting mode that you selected in-camera, the speed of the memory card installed, the USB transfer speed, the hard-disk speed and the computer speed in general. As you see there are many factors influencing that delay, some of which you can not do much about. You camera let you choose how to record the pictures, for example you can select the file format to be written, JPEG, RAW, JPEG+RAW or TIFF. Additionally, depending on the chosen mode, you may be able to select a size, S, M, L and quality, Basic, Normal, Fine. RAW files can also be compressed to various levels. All of this has a direct influence on the size of the recorded image files. The larger the files, the longer it takes to write them to the memory card, the longer it takes to transfer them over the USB 2.0 cable and the longer it takes to write them on the computer's hard disk. Moreover if you use an external USB hard-disk to store the photos the image must go through an additional USB connection before being written to disk. All those times add-up. Moreover, the PTP protocol specifies that the image must be entirely available when the host (the computer) is notified of its presence, meaning that the camera must write the image(s) to the memory card entirely, before signaling the computer that a new picture was just taken, so the memory card write speed also has a direct incidence on the tethered shooting lag that you are seeing. To minimize the lag, use a fast memory card (pay special attention to the write speed of the card, some cards are advertised as fast but are only fast when reading). For best performance chose a memory card with fast write speed, this is not only important for the tethered shooting lag, but also for general camera performance as it takes less time to flush the memory buffer to the card. Some memory cards are equally fast at reading and writing speed and should be preferred if possible, unfortunately those are often the most expensive. Next, prefer writing to a fast internal hard disk than to an USB-connected external disk if possible. Of course, this advice depends on the actual disks, sometimes a newer external drive might be quite a lot faster than an older internal one, in particular internal drives on most laptops are relatively slow due to power consumption concerns. If you use a desktop PC and want the best possible hard disk performance for RAW or large image processing, you might want to consider investing in a fast SCSI-based drive subsystem, for example an UltraSCSI or SAS drive array, as found on high end workstations. This will not only benefit FastPictureViewer but your entire digital workflow as well, as disk speed is a very common bottleneck for data intensive applications and high resolution image processing is no exception. Finally, set the camera to the lowest quality/size setting that satisfies your needs for the task at hand, use lossless compressed RAWs if available, perhaps try RAW+JPG with small JPEGs, see what works for you and choose the most suitable speed / preview quality tradeoff. It should be noted that FastPictureViewer Professional's tethered mode builds upon its full color management and viewing abilities, so it will show color-managed previews from Nikon NEF and Canon CR2 raw files if you shoot in Adobe RGB (most other applications displaying JPEGs previews embedded within RAW files ignores the necessary color conversion when the camera is set to Adobe RGB). You can also move back and forth in the image list to compare with previous shots. FastPictureViewer Professional's tethered shooting works with all image formats including JPEG, TIFF and RAW (on supported cameras). It also work on Windows XP, Windows Server 2003, Windows Vista, Windows Server 2008 and Windows 7, all of these in 32 or 64-bit flavors (RAW support for 64-bit platforms requires 64-bit RAW decoders, please see the image formats compatibility chart for details). Once you went through the initial device detection described above, tethered mode shooting is just a matter of starting FastPictureViewer, picking a destination folder, hitting Ctrl+T and plugging the camera. On XP the operating system insists to enumerate all images that might be already present in the camera when connecting. The connection process will be quicker if you start with an empty memory card. If you have the Nikon Camera Control Pro software installed, make sure you quit this program before using FastPictureViewer's tethering function. On some systems and with some versions of Camera Control Pro, it has been found that the Nikon driver loaded by CCP to talk to the camera is left behind and stays active until the system is rebooted, blocking FastPictureViewer and other PTP applications until the computer is restarted. FastPictureViewer Professional 1.8 introduced an auto-prefixing function.
Press Alt+T to open the Auto-Prefixing (renaming) window associated with the tethering function, which displays the prefixing mode, the prefix to be used and the connection status: 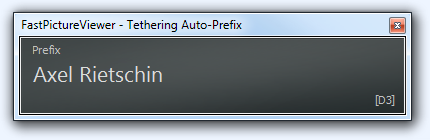
The prefix is set by clicking on the current prefix
with the mouse (or the word None when no prefix was set)
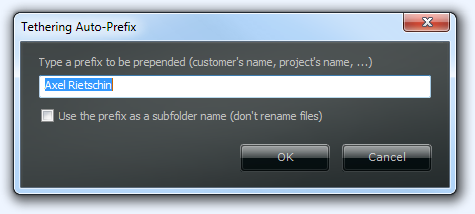
The prefixing function works in addition to the tethering connection function (Ctrl+T). By default the prefix is prepended to the file name being downloaded form the camera. For example if the next image taken is to be named DSC_0123.JPG and the current prefix is John Doe, the image saved to your computer's hard disk will be named John Doe - DSC_0123.JPG. The image written on the camera's memory card is unaffected. The renaming has no effect whatsoever on the image itself or any of the file's content, which is written unaltered. Optionally, the prefix can be used as a subfolder name. Say your tethering "incoming" folder was set to C:\Images and the prefix is set to John Doe with the "Use prefix as subfolder name" option checked: the images will be saved to C:\Images\John Doe\ (the files will not be renamed) until the prefix is set to something else. The auto-prefixing function is invaluable when shooting several people in a row (say a football team's individual portraits): simply set the prefix to the player's name and shoot as many pictures as needed, then change the prefix for the next player etc. This simple action will make it easier to sort out the files later. |
||||||||||||||
Using the File Utilities Batch Processor PluginOne of the most common customer request, both on the forum and on the email channels, was to provide the ability to act on files based on their rating. As a matter of fact, FastPictureViewer Pro is well equipped for fast previewing and rating of images, but, as of version 1.0, the program fell short of file management functions, relegating these duties to other application down the chain.
Starting from v1.1, a powerful rule-based file management plug-in was added. If you are familiar with Microsoft Outlook-style message processing rules, you will feel right at home with the new plug-in as the principle is inspired from the Outlook solution, that works so well for millions of users.
The File Utilities plug-in is extremely powerful,
it would take an entire book chapter just to describe
what it does, and another to explore all the possibilities.
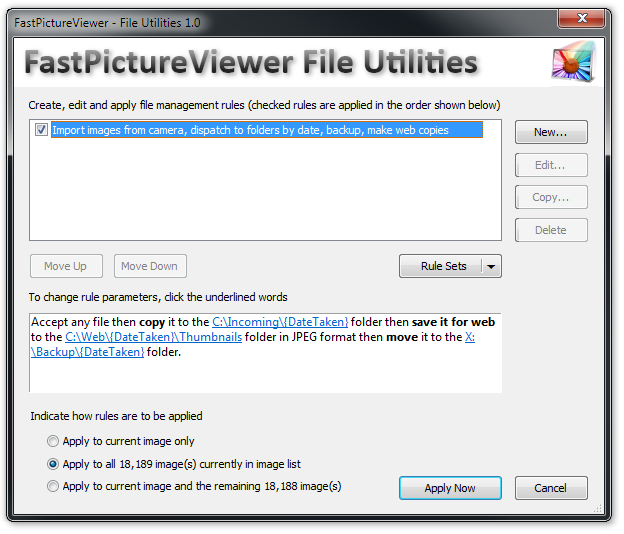
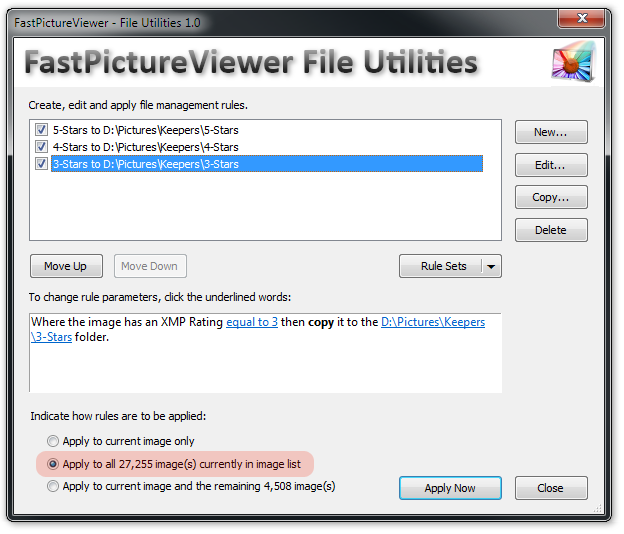
The idea behind rule-based processing is to offer maximum flexibility and power, while at the same time maximizing ease of use. Rules are constructed easily in a point-and-click user interface and can express multiple conditions and logic without the complexity associated with scripting languages, which requires at least some programming skills (but the file processor can be scripted in JavaScript or VBScript, as you'll learn). With the FastPictureViewer File Utilities plug-in, users can build their own processing rules in minutes. Rules can then be applied to the current image or (for registered users) to all images currently loaded in FastPictureViewer's image list, making it easy to apply batch processing instructions such as copy, move, save-for-web or delete, to many files at once, thousands, tens of thousands, hundreds of thousands - it does not matter. The rule execution engine is aware of multiple cores and multiple processors and take advantage of them to run rules concurrently, so batch file processing is fast. The plug-in is invoked by pressing the Ctrl+F key while images are loaded in the viewer. The plug-in is initially empty so spend a minute observing the following screen shot, displaying a sample rule that we created for this tutorial:
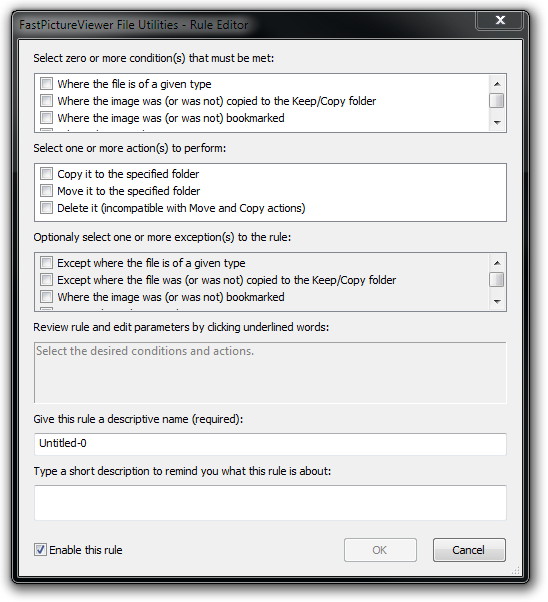
As seen above, processing rules reads like plain English, verbs shown in bold, like move or copy, represent actions. The above rule will import all files (assuming the viewer is currently browsing some folder containing new, unsorted files). The import process is as follow: first, a copy to C:\Incoming is made, in subfolders whose names will be the picture's date taken, as written in the EXIF data. The rule then goes on and creates a web-ready jpeg thumbnail of all files in another folder (raw files conversion being applied if necessary), then finally moves the original files to X:\Backup, which could be an external drive or some network attached storage. This is just an example of a typical import workflow. Some workflows can be simpler or much more complex and completely different altogether but the plug-in's flexibility will let users tailor the batch jobs to your exact requirements. Every action has parameters, such as the destination folder or the dimension of the exported image, and special variables, enclosed in {Curly Braces} can express parameters that are calculated at run time, from example EXIF data, the current user name, the date etc. Rules are automatically saved so they are here, ready to be executed again in one click the next time around. It is also possible to create multiple rules, select or unselect them, and save them as a set to an external file, making it easy to quickly swap rule sets. Users can for example have import rules, export rules, backup rules and more, there is virtually no limit to what can be done, and all rules can also execute conditionally, subject to various criteria described later. The FastPictureViewer File Utilities plug-in currently supports 23 different conditions, 8 different actions and dozens of variables that can be combined in countless ways to create powerful, automated batch processing rules. Creating the first ruleAs an example, let's say we are at the end of a typical FastPictureViewer image culling session during which we viewed and rated thousands of images. Now say we simply want to copy all files that were given a 5-star rating to a designated folder, say for example D:\Images\Keepers\5-Stars. Let's create a rule to do exactly that. We first begin by clicking the "New..." button at the top-right of the window. This opens the rule editor as follow:
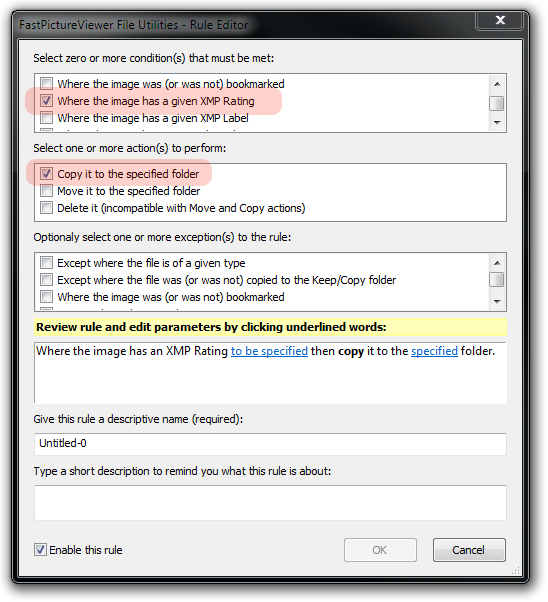
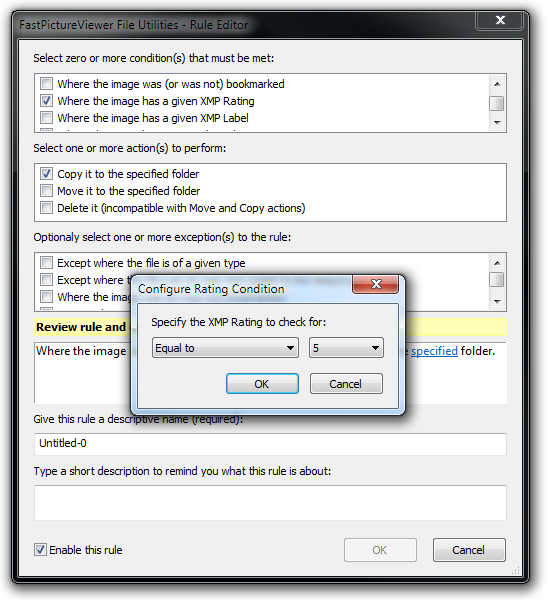
The screen consists in several part. From top to bottom we see the part where the conditions are set. A condition indicates, for example, that a file must have a certain rating. There can be multiple conditions, for example a certain Rating and a certain Label, and all conditions must be met together to trigger the actions, which appears in the second part of the window. An action is something to be performed on the file, for example copy it, move it or delete it. As with any rules, they may be exceptions and the File Utilities Plug-in let users specify exceptions. For example if we don't want to copy files that were already copied to the Keep/Copy folder using FastPictureViewer's file copy mechanism, we can say so by setting the corresponding exception. Here we want to keep things simple and just copy the 5-starred images to our folder on D:, so let's enable the XMP Rating condition and the Copy action, as follow:
We notice that the rule display in the 4th part of the window, below the list of available exceptions, now contains a plain English sentence that says what the rule is supposed to do. In particular we see our XMP Rating condition and the Copy action, both followed by clickable (blue underlined) variables that we need to fill out to complete the rule. Let's click on the "to be specified" words next to the XMP Rating condition. This will bring up the Condition Editor for the XMP Rating condition. An XMP rating is an number from 1 to 5. The rating can net have been set al all on the image, or it can be 1, 2, 3, 4 or 5. The Condition Editor let you precisely state the exact condition to be matched. Here we are only interested in images having a rating equal to 5, so let's say so in the editor:
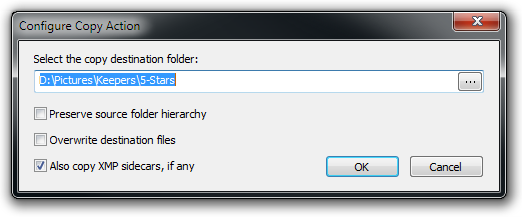
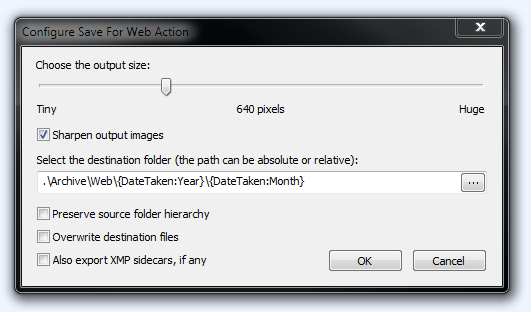
Next, let's click on the underlined variable next to the Copy action and type our destination folder's name (note that the program suggests folder names as you type. You can also invoke a folder picker by pressing the small button at the right of the edit zone. Note the three options on the Copy Action Editor window: the program let you specify what to do regarding folders. If you want to re-create the image's folder hierarchy within the destination folder, you can say so by checking the first option. The second option let to tell the program what to do if a file already exists with the same name in the destination folder. The default is to NOT overwrite any existing file, but you can change this behavior and force the program to overwrite existing file(s) by checking the second option. Finally, of you work with XMP sidecar files and the XMP sidecar option is enabled in FastPictureViewer's XMP Rating options, you can tick the last box to also copy XMP sidecars, if any:
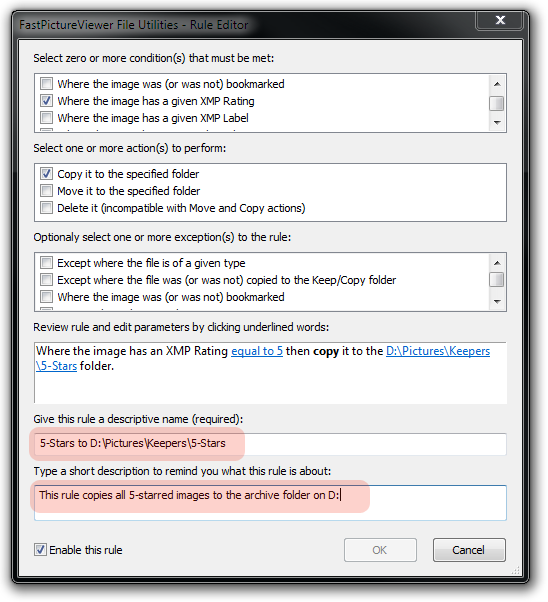
We can now give a descriptive name to this rule, and optionally a description, to help remind us what this rule is about. Take the time to write meaningful names and descriptions, this will help you stay organized later, when you'll have several more rules:
We can now close the Rule Editor and get back to the main plug-in window, which will show our new rule in the rule list. To make another similar rule, say for 4-starred images, simply highlight the rule you want to copy from and hit the Copy... button. The Rule Editor will open with a copy of the highlighted rule loaded. Just change the relevant parameters, update the rule's name and description and click OK to add your new rule. Below is an image of the plug-in dialog after the rule we just created was copied and modified, as just described, to handle 4-starred and 3-starred images. All we have to do is tell the program how to apply the rules. A list of rules is called a "rule set". A rule set can contain many rules (here we depict only 3 but there can be many more, as many as you need). It is possible to disable a particular rule by unchecking it. Unchecked rules are ignored and the actions they contain are never executed. Checked rules can be applied in three manners: the first manner is to apply the rules only to the image currently viewed in FastPictureViewer. The second manner is to apply the rules to all images in the image list (in our screenshot, we see that the rules are about to be applied to more then 27,000 images). The last option applies the rules starting from the current image and until the end of the image list (in the image the viewer was positioned on picture number 22,747, and there was 4,508 images remaining in the list after the current one). Note that the last two options are only available to registered users.
All that is left to do now is to click the "Apply Now" button. The plug-in will take all files one by one and evaluate each rule in turn. If the conditions are satisfied for a particular file, the programmed actions will be performed. In our case, the 5, 4 and 3-starred images will be copied to the corresponding folders on our image archive on drive D:. Rules can be more complex than that. It is also possible to create very similar rules to copy a file to multiple locations, as many as you want in fact: just create a rule for each destination folder, set the appropriate conditions that tells the program what images to copy and the plug-in will perform those tasks quickly and reliably just be pressing Apply Now. Rules and all options are remembered so you'll find them the next time the plug-in is invoked. For more advanced uses, for backup or to move rules between computers, it is possible to save and load rule sets to and from external files. Rule sets can also be seen as "Tasks" so it is possible to group rules into Tasks, say for example a "Backup and Export" task, and a "Dispatch and Delete" task, each containing several rules with different conditions and actions. Tasks (rule sets) can then be quickly retrieved and swapped using the "Rule Set" button. The example above lists 3 separate rules for 3 separate ratings, for the sake of simplicity. More advanced users can take advantage of the macro-substitution facility which let them incorporate variables in the destination folder names for the Copy, Move and Save for Web actions. With macro-substitution, the 3 above rules can be replaced by a single one: "Where the image has an XMP Rating greater than or equal to 3 then copy it to the D:\Pictures\Keepers\{Rating}-Stars folder" with do exactly the same thing as the three separate rules shown above, and the {Rating} substitution macro appearing in the destination path will be replaced by the actual rating number at run time, creating the "3-Stars", "4-Stars" and "5-Stars" folders as needed. You can even use "path macros" to have the program automatically create a Year and Month subfolder hierarchy according to the date and time recorded in the pictures. The File Utilities plug-in of becoming more powerful by the day. We have already added a "Save for Web" action which let users export lean and mean small to medium size JPEGs for web use. This action gets configured in the simplest possible manner, yet create JPEG thumbnails and web-ready images of the highest quality from any supported image formats, including raw files. The produced JPEG images exhibits a perfect balance between file weight, picture dimensions and image quality, with optional (and subtle) adaptive "unsharp mask" sharpening to give your JPEG exports an extra touch of crispness, making them perfect as low-resolution samples for customers, of for web upload as the plug-in automatically performs the necessary conversion to the sRGB color space. Best of all, the export process is very quick, even quicker if you have a multi-core CPU such as Intel i5, i7, or better processor (it is several times faster than similar export function found in other applications, regardless of their price, even more so on multicore hardware. The speed is particularly impressive considering the work involved by the best quality resampling, sharpening and color management performed during exports).
The plug-in takes advantage of multi-processing abilities of modern microprocessors such as Intel i5, i7 and other powerful CPUs to improve overall throughput and speed up its operations. We also have a number of ideas for upcoming builds and we already added a few, such as macro-substitution that can be applied to destination directories names, making it a breeze to dispatch files to some "C:\Pictures\Year\Month" folder tree by date taken, for example, along with new conditions on file size, file date, EXIF date, with some more to come. The batch file processor makes it easy to create powerful rule sets corresponding to typical tasks, for example suppose that one want to create a task to import images from a memory card. For the sake of discussion, let's also suppose that the shooter has his camera set in RAW+JPG mode, and that the import task consists in copying all raws to 3 different folders on the computer (say, C: drive, D: drive, plus a network drive for backup), and all jpegs to a 4th, separate location, and finally to create 640 pixels "proof copies" of everything, saved to yet another location, for example for quick browsing or to create a customer proof CD. You can create 3 rules with a "not JPEG" condition to copy only the raws to the 3 different locations, then create a "JPEG only" rule to copy the jpeg files where you want to, and finally a 5th rule that exports the files in 640px format to yet another folder. Optionally, you could add a 6th rule that deletes everything from the source location at the end, then save this group of rules as a Rule Set and call it, say, "Import Task". From this point on, running the import task boils down to opening the memory card (through a Mass Storage USB 2 or USB 3 connection) in FastPictureViewer Pro, then hit Ctrl+F, recall the "Import Task" set if it's not already there, and apply the rules to all files. One can create simpler rules and rule sets, but also much more complex ones and quickly recall entire sets previously created, from the "Rule Set" drop down menu. There are conditions on image dimension (allowing to express conditions like if the image is smaller then x pixels then... and extraordinary powerful scriptable conditions and actions: it is now possible to write arbitrarily complex conditions based on a number of file and image parameters by writing scripts in JavaScript (or VB Script) language, with all the expressive power provided by a true scripting language. To give a quick taste of what's possible, let's say we want to select all files taken with a 200mm (or longer) lens. All it takes is to write a 1-line function that tests for the condition we are interested in and return 1 of the condition is met, or zero otherwise: function Evaluate(context) Below is a skeleton of the Execute() function where all action scripts begins: function Execute(context) Scripts let you do the most bizarre things, like select only images taken at f/8 (just test the "Meta.Aperture" variable) or anything else you may think of. All other conditions can be combined with each other, so it's easy to build a set of conditions that would select only the images taken on a certain day, at a certain shutter speed, and at the same time having a certain rating etc, etc. The possibilities are limitless! Moreover, substitution variables and relative paths (path relative to the current image's folder) can be used for the script names, opening all kinds of scenarios, such as camera-model based scripts, or scripts relative to a certain image folder... Of course, writing script requires some programming skills, but on the other hand the flexibility and power is limited only by imagination. There is plenty of JavaScript expertise out there, as this is the language used to program all web browsers nowadays: every webmaster and web site author already has at least a passive knowledge of this language, so there is no need to learn yet another obscure little script language to automate FastPictureViewer. The script engines used by FastPictureViewer are the same as those powering Microsoft Internet Explorer (and underneath all script-based activities in Windows), so they are current, gets patched and maintained with the rest of your operating system and are well performing and tested. You can write huge scripts and also take advantage of functionality provided by external scriptable components, such as for example the HTTP Upload or FTP ActiveX components from Chilkat Software, or the very powerful ImageMagick library for image processing and format conversion through its ActiveX interface, as exemplified here. The Evaluate() function within condition scripts receives a context as parameter, a {name, value} pairs "dictionary" which is filled with nearly 50 variables containing information about the file being considered: its name, size, attributes and dates, EXIF data such as date taken, exposure bias, shutter speed, aperture, metering mode, program mode, ISO speed, camera manufacturer and camera model, XMP rating, label and urgency, image dimensions, bits per pixel and more, making it possible to write very sophisticated conditions based on any number of these ready-to-use parameters. Likewise, script actions written in JavaScript or VB Script can perform almost anything on the files, as it is possible to instantiate scriptable ActiveX objects such as the FileSystemObject, the WshShell object and more, along with any 3rd-party scriptable object which may include ActiveX-based 3rd-party image processing libraries, 3rd-party file transfer utilities etc, anything both "ActiveX" and "scriptable" will do. Script actions starts from an Execute() function, which is called with the same context object as the script conditions, so it is possible to set new variable (or alter existing ones) in a "condition" script, and retrieve the modified or added values in the "action" script. This opens the door for even more advanced rules to be created. Scripts reside on disk and can be authored with any text editor such as Notepad (the program does not currently offer script editing facility). GPS Metadata, proximity search, direction search as criteria for batch file processing Geotagging is a hot topic, with more and more digital cameras, DSLRs, point-and-shot and smartphones being equipped with location sensors and able to tag images with the latitude/longitude at which they were taken. GPS metadata often also include a very precise timestamp, derived from the GPS system's atomic clock, as well as altitude, speed data. Provided that an electronic compass is also available, the camera orientation can also be recorded (i.e. the direction into which the image was taken). Companies such as Nikon, Solmeta and Dawntech produce GPS add-ins that can be added to a growing selection of Nikon digital reflexes, which can then tag images directly when equipped with such an add-on device. Numerous "off camera" solutions also exist, where a GPS-based tracker - carried by the photographer - records the location and time-of-day at a few second’s interval. Later on, a special application (either bundled with the tracker of 3rd-party, for example GeoSetter) will read the tracker's log and automatically tag images according to the location of the tracker device at the time the image was taken. Once tagged, either directly by the camera or afterwards on a computer, images uploaded to online photo-sharing services such as Picasa or Flickr can be placed on a world map. Search engines can also perform location-based image searches and more. FastPictureViewer Professional extracts GPS metadata (coordinate, time, speed, altitude, orientation) stored in standard EXIF tags. Specific “trigger conditions” can use this data to select (or ignore) files during batch file management tasks. The GPS Location trigger let users indicate the coordinates of some point of interest and a radius around this point in various distance units, for example 300 meters or 300 yards around some monument. An option tells the program to consider only image taken within the given radius, or image taken outside it. The program uses a model of the Earth known as the WGS-84 spheroid, which approximates the shape of the planet more closely than a sphere. Distances are approximated on the spheroid by computing the length of geodetic curves, so estimations should be relatively accurate including for large radii.  If the GPS device is equipped with an electronic compass, the camera orientation was also recorded, indicating the direction of the lens at the time the image was taken. Knowing where the lens was pointing, the program is able to restrain the selection to images actually taken towards the given coordinates. The program takes the magnetic declination into account and attempts to correct for it, compensating for differences between the North pole direction and magnetic compass readings. An angular tolerance parameter is available, allowing the user to tell how strict the camera direction criteria should be. The program also has a separate GPS Direction trigger condition available, also subject to the presence of camera orientation data provided by a compass. The direction trigger can be used to select images taken in some direction, say South, independently of the location.  Additional triggers on GPS speed altitude are also provided, making it easy to select images takes up a mountain (high altitude and at rest) or on a plane (high altitude and high speed). Finally a condition on the existence (or absence) of specific metadata elements is provided, making it a breeze to select geotagged images, or those which are not, for example. 
 Image selected by one or the other of the above conditions can then be acted upon with the available “actions”, including Copy, Move, Delete, Rename, FTP Upload and Export-to-JPEG. 
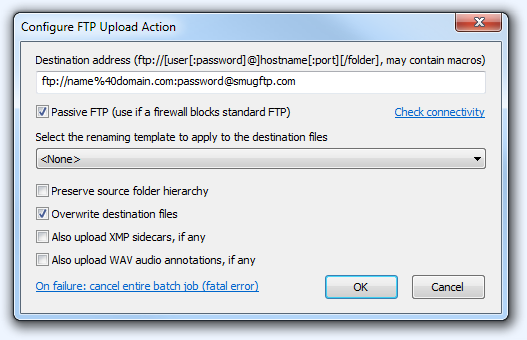
Advanced Topics: scripting, hard links, macros and variablesAdvanced users can take advantage of the built-in Script Engine conditions to write their own selection criteria's using JavaScript or VBScript. As an example, please find below a custom condition written in the JavaScript language that selects files taken with a 200mm lens or longer. This is just a simple example but many other EXIF data elements are available and the whole expressive power of the JavaScript (or VBScript) languages can be used to build condition and action of any complexity! 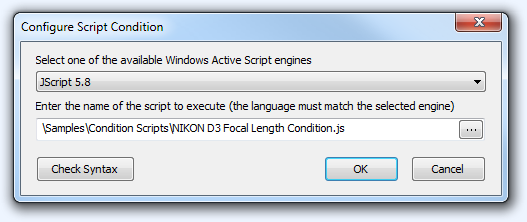
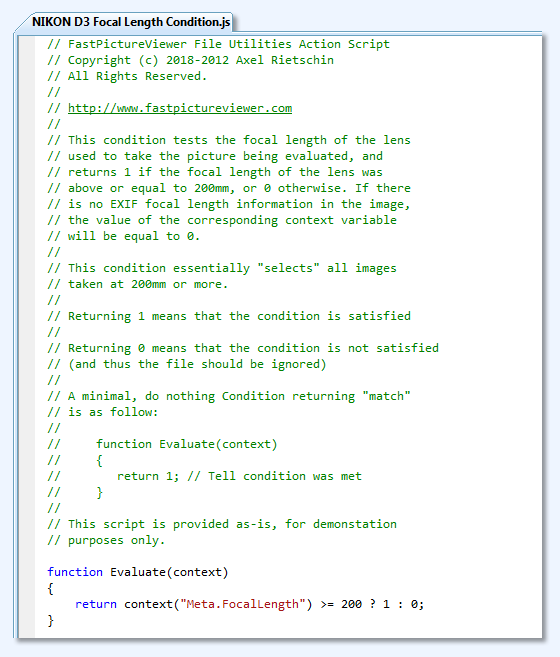
Similarly, actions on the images can also be scripted, which allows nearly all imaginable actions to be taken as scripts allows for great flexibility and control. The script execution engines are shared with IE so they are blazing fast, dependable and robust, unlike homegrown mini-languages found in some other applications. Last but not last if you know how to program in VB, VBA or VBScript, or JavaScript (most web developers do) then you already know how to script conditions and actions in the FastPictureViewer Batch File Processor! 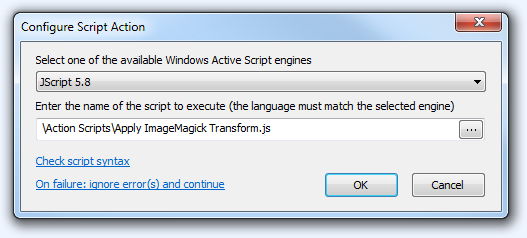
NTFS Hard Links (Advanced topic)In addition to the Copy and Move actions, FastPictureViewer Professional offers the unique ability to create NTFS Hard Links to the original files. A hard link is a reference to the original data file, which can reside anywhere on the same volume as the original file. You can think of it as an alternate directory entry pointing at the same file. Hard links are undistinguishable from regular files to the naked eye, in fact, every directory entry on NTFS file systems are hard links. What is little known however is that the file system is not limited to just one hard link (aka directory entry) per file: NTFS supports up to 1023 (!) links to the same file, so the same file can appear in up to 1023 different places, or under 1023 different names, while still taking only 1x the disk space required to store its data. The user interface of the Hard Link Action is very similar to the one of the Copy and Move actions: 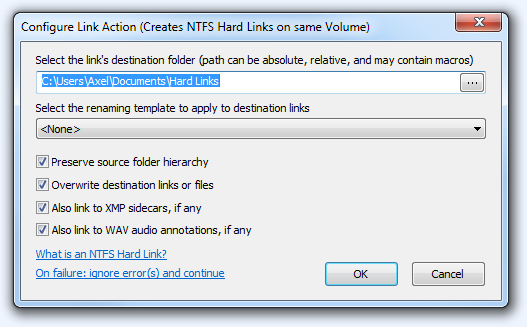
The action creates links to the original files at the specified location, optionally
also linking to any related XMP or WAV file of desired.
Hard links take virtually no disk space since the file's data is not copied! You can delete a hard link without deleting the original file: a file is properly erased only when the last link to it gets deleted. Using hard links, it become possible to "project" an image collection in different manners in the file system without duplicating the files. For example an image, say ABC.JPG, can be stored for example in C:\Images\Originals and hard-linked from C:\Holidays\2012\NorthPole. The two links will refer to the same data (not copy!) and in fact none of them is the "main" link, they are both equal. One can be renamed (or deleted) without affecting the other. One caveat, though: since the underlying file data exists only once on disk, editing the file from either link modifies the underlying file. For example certain in-place metadata edits which rewrite portion of the metadata in the file itself will be instantly visible from all links to the file. There is one place where it gets tricky, though: if you edit the image with some image editor, say Adobe Photoshop, it will not rewrite the file but instead create a copy when saving. The copy has a different name and really is a brand new file. When the save completes (the new file gets flushed to disk and everything went fine) the photo editor deletes the original and renames the temporary copy. This mechanism avoids losing the file irremediably shall something occur during the save. The thing to know is that, when editing from a hard-link, said hard link will be deleted during the "save-to-temp-and-rename" operation, and the newly saved file will be a copy in its own rights and no longer a hard link to some other file. This effectively implement a copy-on-write scheme which is not a problem per se, but users needs to be aware of what's going on: editing an image file from a hard link will usually not change the original. This sounds like a contradiction with the first sentence of this paragraphs but it's not if you think again: writing to the file from any hard link will affects the only underlying copy of the data, but a save-to-temp-and-rename operation - as done by photo editors every time a file is saved - creates a genuine new file, no longer linked, in the save folder. Hard links only works for files on the same disk volume, and the volume must be formatted with the NTFS file system. We consider creating hard links to be an advanced topic. This is a powerful feature but users needs to be aware of the caveats mentioned above, in particular that most image editors will create local copies when saving files so they are best reserved for situations where no image editing will be performed. If you are unsure, just stick to the tried and true, plain vanilla copying or moving but hard links can save the day when used knowledgeably: they let you organize or reorganize files in new folders without actually copying or shuffling around the actual data making up the files. Variables available to scripts and macrosBelow is an indicative list of the 100+ variables available to script conditions and actions (as of FPV Pro 1.9, more might be added in future versions):
|
||||||||||||||
Using the Web Publishing SubsystemStarting with version 1.7, FastPictureViewer Professional includes a sophisticated image publishing sub-system, consisting in a plug-in which itself hosts publishing plugins, each knowing how to "talk" to a specific photo-sharing website.
The web publishing plugins currently included in FPV Pro communicates with SmugMug, Zenfolio and PhotoShelter, the top three pro-grades photo sharing web sites used by many professional photographers around the world. An export plugin allowing users to publish files to a local storage device like USB key or digital photo frame is included in FPV Pro 1.7.240.0 and later. Below is an overview of the publishing sub-system built into FastPictureViewer Professional. As with every features of FPV Pro, the user-interface surface shows a little as possible to avoid clutter, but you can dig deeper to reveal more advanced options and settings, if you feel inclined to do so. For basic use, web publishing in FastPictureViewer Pro goes as follow: when reviewing pictures, press the P key to flag images for publishing as you go. You can flag as little or as many images as you want during a review session, and if you want to publish all images then press Shift+P to mark them all at once (those commands are also available from the "Publishing" popup menu, displayed when right-clicking the program's taskbar at the bottom of the window). When your selection is complete, you can optionally review only the marked images (using the View Filter feature, F-key) and when you are happy and ready to publish, just press Ctrl+P to fire up the Publisher, then click the "Publish Now" button. That’s it. Before reaching that point a little bit of configuration is in order for first-time users. First you must pick the publishing plugin(s) you want to use, that is, chose the destination where you want to publish your pictures. Let’s walk through the one-time configuration procedure step by step. The first time the Publisher is fired-up, you are presented with an empty dialog window as follow: 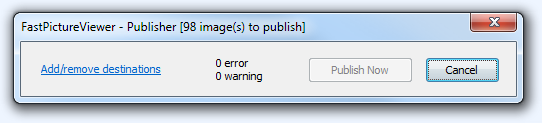 Upon clicking the Add/remove destinations link, you are presented with the publishing plugin selector which list all currently available publishing plugins. 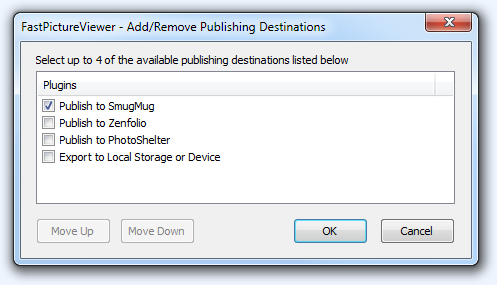 After selecting a plugin and clicking OK, you are returned to the Publisher's main user interface, which is now populated with your selection: 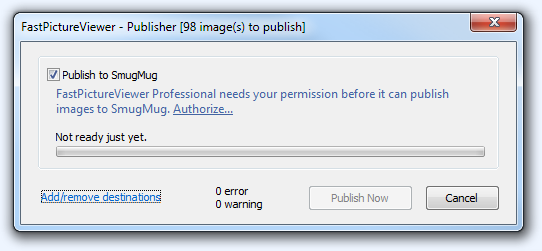 Depending on the chosen destination, the authentication method can vary. The few screens that follows are specific to SmugMug, which uses a three-legged authentication scheme known as OAuth. As a side note, OAuth is a great mechanism to give controlled access to your account, as you never need to give your account's credentials to anyone in order to authorize an application to post to your account on your behalf. This is way better than the old-fashioned way where every applications having access to your account were given your user name and password by necessity, thus giving them full and unrestricted access to your account and also the responsibility to keep your secret password safe, something that was not granted. With OAuth you can revoke an application's access without affecting other applications, or change your password at will, and since your password is never given out, your account is far more secure than it used to be with older techniques. FastPictureViewer of course fully supports OAuth authentication. As can be seen on the above screen, the SmugMug plugin needs your permission to access your account. Let's walk through the SmugMug authorization procedure, which is typical of most modern web sites. Upon clicking the Authorize... link appearing in the text, you are presented with the 1st step of the activation procedure: 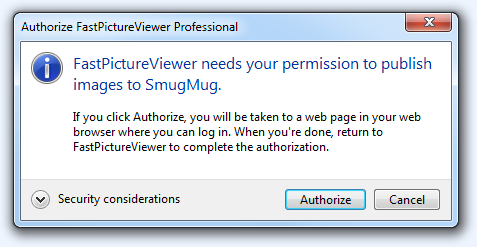 Clicking the "Authorize" button will launch your web browser (or a new tab in your running web browser instance) and present you with the SmugMug login verification page. This page is displayed in your own web browser, over a secure (HTTPS) connection, entirely outside FastPictureViewer. As a result the credentials you enter on that page are known to SmugMug only and are never revealed to us. You can verify, on your browser, that you are indeed connected to the SmugMug web site and that the secure connection is in effect by looking at the address bar of the browser, where you should see the familiar lock icon and - depending on the browser you use - some visual cue confirming that everything is OK with the web page and web site. The web being a very fast moving place, the screen below may differ slightly from the actual ones on SmugMug if they changed then in the meantime. Anyway, the overall workflow should be the same as the one described here. 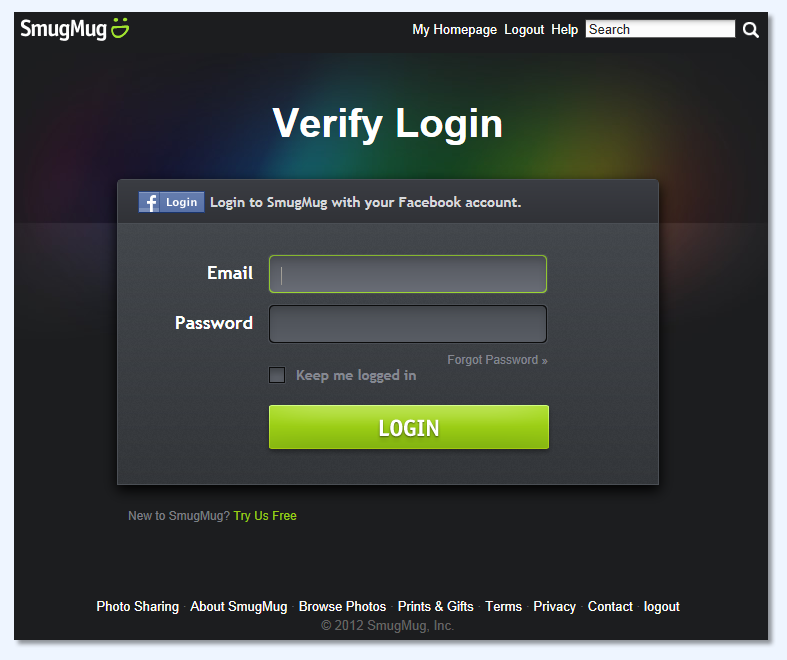 After login-in to SmugMug using your credentials, you should see a confirmation screen displaying that FastPictureViewer Professional is now authorized on your SmugMug account. Other services may also present you with a PIN, typically a 4 to 8 characters code, that you need to enter back in FastPictureViewer. 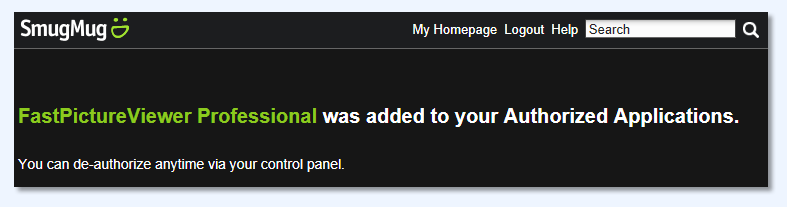 After closing your web browser, please return to your running instance of FastPictureViewer by clicking its name on your taskbar or pressing Alt+Tab until you are back to it, then click the "Authorized" button on the displayed dialog window. Only click that button after you have completed the authorization procedure in your browser. 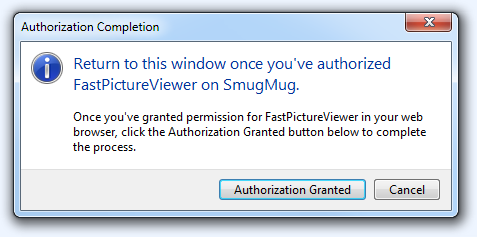 That's it! That last click completes the one-time authorization procedure and a beautiful program has met a beautiful photo sharing website. You are now returned to the main Publisher user interface, which now says that FastPictureViewer is authorized to publish on the site.  One last important step remains before being ready to publish from FPV Pro for the first time: you need to create a gallery on SmugMug, or pick an existing one, to tell FastPictureViewer where to send the images. To that effect, click the "Settings..." link on the light blue text and the SmugMug plugin's preference dialog will open: 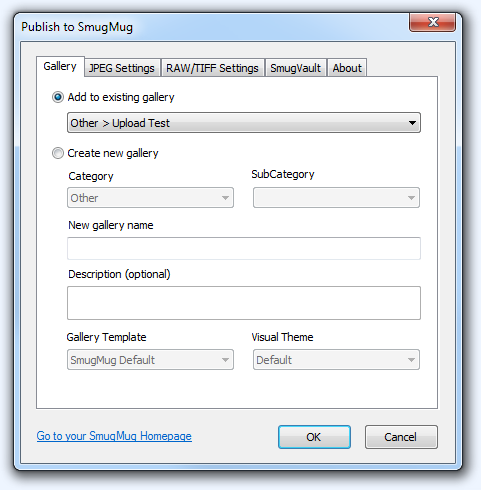 This page should be pretty straightforward: you can select an existing gallery by clicking on the gray bar below the "Add to existing gallery" prompt. This will drop down a list containing your existing galleries, from which you can click a gallery name to select it. If you have many galleries the list will be scrollable to allow you to reach all existing galleries. The display format starts with the top-level category (all SmugMug galleries live in one top-level category), then the subcategory (if any) and finally the gallery name itself. On the above screen the top-level category is called "Other" and the gallery name is "Upload Test" (there is no sub-category name). Of course the name of your own galleries will vary, the above only reflects our own test account. If you don't have any gallery yet, this choice will be unavailable and the "Create new gallery" will be automatically selected instead (you can chose to click this button right now if you want to create a new gallery). In gallery creation mode, you can pick the Category and SubCategory into which the new gallery should be created, then indicate its name as well as a short description of the future content. SmugMug offers many customization settings for each gallery and supports the creation of gallery templates, which are not real galleries but simply named sets of preference settings. If you have previously created some template, which can specify all gallery attributes including privacy, sharpening settings, watermark and so one, you can select it here and your new gallery will automatically inherit from all the pre-set properties of the template. If you are just starting with SmugMug you can leave this choice to "SmugMug Default". All gallery settings are always available directly on the SmugMug website so you can change everything later on. On this page you can also pick one of the numerous SmugMug visual themes to control the look and feel of your new gallery. Note that this page and all features it contains are specific to SmugMug, other services may offer different settings and consequently the preference page will be different. Please refer to the SmugMug website for more information, details and help about the SmugMug features exposed above. Once you have selected an existing gallery (or filled-in the name of a new one to be created) you are done with the basic settings. You can now click the OK button to close this window and return to the main Publisher dialog. We'll get back to the other preference pages of the FastPictureViewer Professional SmugMug upload plugin at a later time: there is a lot more to see and explain but enough for now, let's publish something! 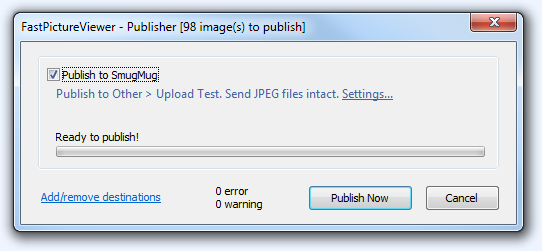 The Publisher and the SmugMug upload plugin now have all the information they need to start sending files. All settings are remembered by the program and all your selections will be retained until you change them. That means that the next time you press Ctrl+P to publish something you will get back exactly here, in the "ready to publish" state and everything will be remembered including the window position on the screen. Click the "Publish Now" button to start the upload process. In this example we selected as many as 98 images for publishing. You can select as few or many as you want, from a single one to several hundreds if you like. SmugMug currently seems to have an upper limit of 5,000 images per gallery at the time of this writing, so please make sure you stay within the service's self-imposed limits but there is no artificial limitation imposed to you by FastPictureViewer: if you want to upload 5,000 images in one big swoop to a new gallery, so be it (even if we are not certain that it's a good idea to have that many images in the same gallery). 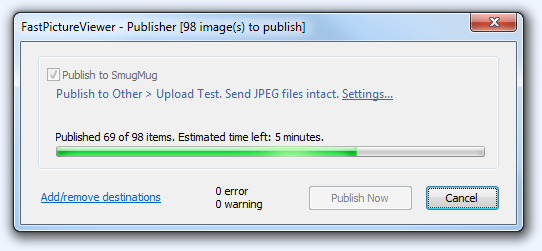 The Published displays a true progress indicator during uploads (it does not skip from file to file but displays the actual progress). Simple wait until it's done - you should hear a beep when all uploads are completed, if this option was enabled in the program's main preferences. 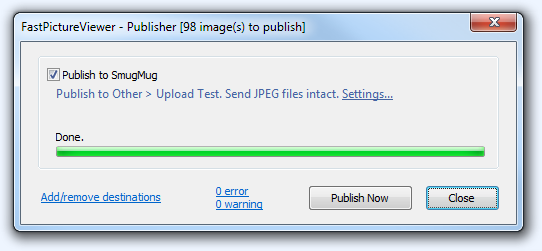 You can now close this window and go to your SmugMug homepage on the web to see your newly uploaded pictures. Note that the rightmost button changed from "Cancel" to "Close" at the end of the upload operation. The "Publish Now" button is now enabled gain and you can click it to send the same image once more, perhaps to another gallery, or with other settings: you can also click the "Settings..." link which is also active again. This concludes part 1 of this web uploading tutorial with FastPictureViewer Professional, sending images to the SmugMug photo sharing website. Publishing to Zenfolio, PhotoShelter or to a local storage device (with other included plugins) is very similar. The next part (to be added to this page) will cover advanced options, such as JPEG and RAW/TIFF settings, as well as the SmugVault option for SmugMug users. Some more technical notes: The FastPictureViewer Web Publisher plugin sub-system is a high performance piece of software. It uploads images one-by-one (to guarantee that the images arrive to the remote site in the correct order) but as fast as your upstream connection to the internet allows - or as fast as it can read data from your disk, whichever limit comes first. After each image, the program waits for the service to acknowledge reception of the file then proceeds to the next image and so on, until all queued files are uploaded. Geeks and performance-oriented power users will be happy to learn that the program transmits asynchronously and overlaps disk reads with network writes, and as such it can saturate the fastest upstream connections - up to the limits imposed by the hardware. By default the program sends files intact exactly as they are on your disk without any processing, but advanced options (not shown in this tutorial yet) allows you to control what metadata gets uploaded, and even to resample and rescale the images being uploaded to make them match certain criteria's, like maximum pixel dimensions or maximum print size (in which case the program decides what resolution to use to match the stated long edge paper dimension). When such processing occurs, either because the user selected it in the advanced preferences (the tab pages that we skipped above) or by default when a file is not in the JPEG format required by SmugMug and most photo sharing sites as well as most web browsers today - for example in RAW format or any of the 45+ image formats and 430+ RAW variants currently supported by FastPictureViewer - new JPEG images are created in memory on-the-fly and streamed directly to the network interface, without ever writing temporary intermediate files to disk. Last but not last, the publishing sub-system in FastPictureViewer Professional can use multiple publishing plugins in parallel (currently up to four) and is able to upload to several locations at the same time, each with its own set of preferences and settings. For example it is possible to upload, say, original full-resolution files to SmugMug and the same images downscaled and recompressed for screen viewing to, say 1280 pixels max, to some other web site or to the local hard disk - all at the same time. This capability is a key design feature of the subsystem and is already enabled. It takes advantage of multiple processor cores for true parallel processing, but users must wait until we create and ship another publishing plug-in to take advantage of it... Speaking of plugin development, we are happy to discuss with you if you'd like us to produce a FastPictureViewer publishing plug-in for your service (subject to terms that must be beneficial for both parties of course), or if you want to create your own plug-in. The basic requirements for plug-in creation includes native C++ / ATL / COM skills and the ability to digitally sign code using a valid Authenticode signing certificate issued by a trusted root CA, as FastPictureViewer never loads unknown modules in its own process space. The web publishing plugin environments within FastPictureViewer Professional leverages many internal features of the program and provides robust high-level services such as OAuth 1.0A HMAC-SHA1 Authorization, OAuth-enabled HTTP(S) GET/PUT/POST REST services, multipart/form-data encoding, image processing such as format-agnostic image loading, automatic bit-depth conversion to 24bppBGR, automatic color-space conversion from whatever input color space to sRGB - with very good detection of many edge cases, metadata writing (fill a struct, call one method) and image downscaling as well as secure (DPAPI) storage for sensitive data such as authentication tokens, secrets and user credentials for services that requires it, plus built-in high performance event tracing (ETW), so the bulk of the work is reduced to talk to your own service, we take care of (most of) what remains to be done - but you can also do all by yourself if you like! |
||||||||||||||
Using the Smart Auto-Grouping Plug-in (automatically groups images based on time or place)FastPictureViewer Professional features a unique
function that allow users to group images from
their GPS coordinates or their time taken.
This feature was originally called "GeoClustering", a term that we made up in January 2012 to describe the ability to group files according to their respective spatial proximity (images taken at close distance from each other) or temporal proximity (images taken at or near the same time). That name, while accurate, was rather obscure for most users and we now call this function Smart Auto-Grouping.
The File Utilities plugin, which also ships with FastPictureViewer Professional, offers the ability to select images taken during a certain time interval, or near a certain GPS position. Those function works by giving the program a time range or latitude/longitude coordinates, and the File Utilities batch processor examines the images one by one and checks to see if they fall within the specified time range, or within the specified radius around the given position etc. These features are terrific for their intended purpose but they need a point of reference (time range or position) to compare images against and decide to select them for processing or not. These functions can be used to find all images taken, say, between 12-noon and 3PM on a given day, or within 1 mile of the Eiffel tower, with great precision. The Smart Auto-Grouping plugin, invoked by pressing Ctrl+L when pictures are displayed, solves different problems and works very differently: instead of comparing images one by one against a known reference point, it looks at all images at once and groups the nearby ones automatically. All the plugin needs to know is what "nearby" means to you. For example, for time-based grouping, the plugin needs to know how close, time-wise, two images needs to have been taken to be considered parts of the same cluster. You could say for example 10 minutes, meaning that images taken less than 10 minutes apart belong together. Likewise, the spatial-based grouping algorithm only needs to know how close, as in "distant from each other", two images needs to be to be considered parts of the same group. As long as the "next" image is within the range, it will be added to the cluster and so on. Note that this is quite different than selecting the images within a specific radius around a point: here you don't need to tell any specific point, just tell how close images needs to be to get grouped. You could say for example 100 yards, and all images taken within 100 yards of any belong together. Try to picture a map of the world, of a country or region you visited, with a pushpin showing the location of each picture you took during a trip in that area. Looking at the map from a distance, it would be immediately apparent, at first glance, that images are clustered around the centers of interest you visited. Likely, a number of relatively small areas will be well-covered by many pictures, while other areas - those you were in transit for example - will be much scarcely covered. What the GeoClustering Utility plugin does is to automatically find those well-covered areas and copy those files together in a new folder. The plugin will create a folder for each cluster of photo is finds, and you end-up with all your images neatly grouped by location, each spot in its own folder, no matter how many. Say you are grouping by GPS coordinate, and stopped at location 'A' in the morning and took some pictures, then moved to location 'B', 'C' and 'D', taking more pictures at each location, then stopped at spot 'A' again on the return trip in the evening and took some more pictures from that location. The Smart Auto-Grouping plug-in will find all images taken in location 'A', those from the morning and those from the evening, and group them together in the same folder, while pictures taken at 'B', 'C' and 'D' will sit neatly together in their own respective folder. The time-based clustering algorithm also looks at all images at once and finds those portions of the timeline where images were grouped together (because you took them in quick succession). Let's say, for example, that you are a landscape photographer on a trip to some wonderful country. At every picture-worthy location you stop and setup your gear, then take a few pictures of the magnificent scenery. On some occasions, you also take a quick succession of partially overlapping picture with the intention to stitch them together later to create a panoramic view. Panoramas needs special processing using a "panorama maker" application (like Microsoft ICE, Adobe Photoshop's Photomerge, Autostitch, or kolor.com's AutoPano). The problem is, how do you quickly find the images that were supposed to be stitched together, among the many hundreds if not thousands pictures you took during your trip? Of course you can use FastPictureViewer Pro fast viewing abilities to quickly scroll through the images one by one at a quick pace, or look at the thumbnails in Windows Explorer (FastPictureViewer Pro and its FastPictureViewer Codec Pack add-in enable thumbnail views in Windows Explorer for all raw and non-raw formats they support). Still, even with the best tools, the search process is going to be tedious if you have many images. Now, imaging that you know a panorama is always a particular sequence of very nearby images on the timeline (you always take them in quick succession), you could tell the GeoClustering Utility plugin to locate and group those files automatically: say that your panoramas are always composed of 5 or more pictures, takes 5 seconds or less apart from each other (or any other numbers that suits you). You can tell the plugin to look for sequences of 5 images or more, taken 5 seconds or less from each others. The Smart Auto-Grouping plug-in will find and extract those sequences and copy them each in their own folder automatically, in just seconfs, i.e. in a fraction of the time it would take to locate those files manually. This plug-in can save you a phenomenal amount of time when organizing or sorting out your files!
Keep in mind, though, that this plugin is very
computationally intensive: the time-based grouping
works in one dimension and runs relatively quickly,
but GPS-based clustering uses precise math and requires many
great-circle distance calculations, and this will use
a lot of CPU time and RAM. We use
parallelization where possible and the bulk of the
computations is spread across available
processor cores to optimize performance.
Instead of copying the files, the plugin can also move the files or, if the destination folder is on the same NTFS volume, it can create links to the destination files instead of making copies. These links, known as NTFS Hard Links, are described as part of another feature, part of the File Utilities batch processor, that also create such links. Hard links are considered to be an advanced feature, you don't really need them and if you are unsure, simply stick to the tried and true copy and move operations. Optionally, the plugin can rename the destination files or links using a powerful template, created using the file renaming (F2) function of the program. It can also preserve the folder hierarchy of the source files, relative to the current image folder, and copy/move/link to XMP sidecars and/or WAV audio annotation if you use these types of files. All settings and the window position are remembered between sessions, making it easy to reuse the same parameters the next time around. Lase but not lease, the Smart Auto-Grouping plug-in can use reverse-geocoding to file the place names and name the resulting group folders accordingly, if you enable this feature and have are connected to the internet while the plug-in is running. Regarding the possible values for the parameters, 15 minutes for time-based clustering, respectively 500 meters (or yards) for location-based clustering will produce relatively fine-grained clusters. If you travelled through an entire country and want to cluster more or less by city or region, you may want to increase the radiuses to something like a few hours, kilometers or miles. For example if you visited New York City, a radius of two miles will probably get you a nice folder with all your NYC pictures in it, keeping in mind that the radius is used to compare distance between the group and any image, so the group itself can span an area much larger than the radius. If you want to cluster Greenwich Village, the Financial District, the East Village and Central Park separately, a quarter mile attraction radius will do the trick. There is nothing wrong with fine-grained clustering, though: you can use a 1-second time clustering with a minimum cluster size of, say, 4 pictures, to find the high-speed bursts taken in continuous shooting mode. Just keep in mind that the smaller the attraction radius, the more clusters you get (but you can play with the minimal cluster size to find the right balance). Finally, keep in mind that GPS localization is not an exact science. First, the earth is not a sphere and the GPS system uses an approximation. Next, the precision of the information given by a GPS device varies with time: if you plot the "track" of a perfectly still GPS receiver - with a clear view of the sky - over a few hours, you will be surprise to see that the device thinks that you moved quite a lot during that time. Bottom line: do not use tiny radiuses (say less than 50 meters or yards) if you want to cluster images by GPS coordinates and that said images were taken far apart in time (e.g. hours or days apart, or more). On the other hand you can use as small a radius as you want with the GeoClustering plug-in, for example 0.1 meter = about 4 inches, but the result might not be as perfect as you'd think - unless the images were taken within a very short time span - because the data used to determine the position is approximate, the earth geometry used by the plugin is simplified, and the accuracy of the computations introduces small errors, too. |
||||||||||||||
Using the Batch Delete functionFastPictureViewer Professional features a Batch Delete function allowing users to mark images for deletion (using the X key), then later delete all marked image at once (using the Ctrl+X keystroke). The commands are also available from the taskbar context menu, accessible by right-clicking the bar at the bottom of the program's window.
Images marked for deletion displays a translucent red "X" at the bottom left of the window, along with a "[Delete]" indicator on the right-hand side of the taskbar (see illustration below). Starting from v1.1.142, pressing the X key can also optionally cause the program to advance to the next image in line. This option can be enabled in the program's preference, by setting the "Automatically move to the next image after rating" in the XMP Rating tab. This makes it even faster to review images: X - reject, 1 to 5 rate, and the program advances automatically to the next image after the user input is recorded!
When pressing the Ctrl+X keystroke, the user is presented with the following dialog window:
A choice is given to attempt to move files to the system's Recycle Bin instead of deleting them directly. This gives the opportunity to "undelete" files from Windows Explorer's Recycle Bin in case a deleted file needs to be recovered. Note that this option slows down file deletions considerably. Upon pressing the OK button the program performs the requested operations, then the window closes and FastPictureViewer reloads the current folder (which may be empty if all images were marked for deletion and have been removed). The program intelligently handles RAW+JPEG stacks, and also takes care of any XMP sidecar file, if the option to create such sidecars is enabled in the program preferences. |
||||||||||||||
Display a translucent on-screen PNG Overlay (Watermark)FastPictureViewer Professional can display a transparent logo or banner on top of the images in the program's window. This feature is great if you use FPV Pro during public presentations or shootings, for example you could project images as they are shot through an LCD projector connected to a laptop, with FPV Pro performing the
real-time image download from your camera using
the built-in tethering function, or monitoring a designated
"hot" folder for incoming images, perhaps sent wirelessly from one or more remote cameras.
The logo is mixed with the displayed images in
real-time, without modifying the images themselves
in any way.
To enable this feature simply create a PNG file of reasonable dimensions with your text or picture logo using any PNG-capable image editor (like Adobe Photoshop, the free Paint.NET, Corel PaintShopPro etc). You can use all of your editor's features including fonts, shadows, transparency masks etc, there is no limit to what you can do. Save your logo in PNG format with transparency (aka PNG-24 + alpha), rename the file to Overlay.fpv and place the renamed file in your root image folder (the image folder that you open in FPV Pro). That's it! Think of it as an on-screen watermark. The stylized XYZ Photography text
in the example below is a PNG overlay. You can of course create any logo of your liking, and if you reduce the opacity of the whole logo before saving it as transparent PNG (anywhere between 25% and 50% opacity should works well) then the logo will be blended with the underlying image, as seen below.
 The program will automatically sense the presence of an Overlay.fpv file the next time the folder is opened and use it auto-magically! There is nothing to configure: just put the Overlay.fpv overlay image in the root of the image folder tree you are opening in FPV and the program will take care of the rest. Note that you are in full control of the logo itself, you can use any graphics or text, and any effects like drop shadows, transparencies etc. to create the most stunning watermark effect! Just remember to save the file in PNG format and you are only limited by your creativity. The watermark is rendered and alpha-composited in real-time using your Direct3D hardware accelerated graphic card so there is no perceptible performance impact incurred by using this feature. The file name and .fpv extension were chosen to avoid conflicts with actual images. You may need to change your folder settings in Windows Explorer to display the file extensions, as they may be hidden by default on your computer. More details about this feature can be found in this forum post, notably there is a way to specify a different name for the overlay file, or use a fully-qualified pathname to point to a single specific watermark image as well as control the overlay placement to some extent. |
||||||||||||||
Dynamic Black & White PreviewBlack & white previews are just a keystroke away: hit the 'B' key to quickly convert the current image to the must stunning black & white preview, without modifying the file on disk in any way!
Simply press B again to revert to full-color. |
||||||||||||||
Mouse options and Smart Mouse Acceleration featureDigital images created by today's digital cameras are much bigger than the computer monitors they are displayed on. As a result, panning such large images in 100% zoom mode or more require a lot of desk space to move the mouse. FastPictureViewer Professional has four specific features letting users tailor the mouse and scrolling behavior to their liking.
Together, the above functions let users tailor the program behavior to their liking. One may argue that so many options for such a mundane thing as mouse scrolling is overkill, but the mouse being the primary input device of FastPictureViewer we find essential to offer users good flexibility and control over the mouse behavior. Once fine-tuned for a given monitor dimension, mouse device and image size, the mouse scrolling functions and behavior within FastPictureViewer becomes an essential and unique element of the user experience offered by our product. As a side note, we found that Microsoft-branded optical mice generally offer the best control, smoothness and precision. |
||||||||||||||
Mouse Gestures RecognitionFastPictureViewer Professional 1.8 introduced a mouse gesture recognition engine, allowing users to send commands to the program using mouse gestures instead of keyboard
shortcuts or mouse clicks. As of version 1.8.245 the Mouse Gestures Recognition feature is
available as a preview feature and only supports two commands: previous and next folder, available when sorting by folder and file name.
The Mouse Gestures Recognition engine is off by default, you can enable it in the program options (see the Miscellaneous page).
There is no need to click and hold the mouse cursor or to do anything special except the gesture itself. FastPictureViewer Professional constantly monitors the mouse position and recognizes gestures as they are made: just stop moving the mouse for a fraction of a second after performing a gesture. The first version of the engine requires that gestures are drawn relatively cleanly and in one sweep. For example to jump to the first image of the previous folder, when sorting by name, draw a W shape on the image surface, in one continuous and relatively quick movement. Try to draw a straight shape with sharp angles and relatively straight lines, then stop for a fraction of a second. Tilted, rotated or skewed gestures will not be recognized very well in the first release, however the size of the gestures does not matter much. The recognition engine will be enhanced in the future (better and quicker recognition of imperfect gestures) and new gestures/commands will be added, allowing users to control more aspects of the application without touching the keyboard or clicking on anything. |
||||||||||||||
Using a Wacom-style pen-based input device with FastPictureViewerFastPictureViewer Professional mouse-related features
works well with pen-based tablets in mouse emulation,
with the exception of the "infinite scroll" feature of
FPV Pro, which
needs to be turned off (see the options). Users can adjust the mouse
acceleration level described in the above section to
make panning easier and avoid running out of tablet
space when panning large images. The mouse gesture
recognition should work just well on a tablet input
device.
|
||||||||||||||
Custom Annotations (Annotate images with Rich Text Format comments)FastPictureViewer Professional can display optional rich text annotations (with
sophisticated formatting such as custom typeface, text size, font effects like bold, underline, italic etc) in a floating semi-translucent window similar to the other gadgets like the EXIF
Shooting Data window etc. The Rich Text Annotations are authored in
Rich Text Format (RTF) and saved in XMP data either embedded within the files (for example using ExifTool) or in separate XMP sidecars. The Rich Text Annotation window automatically wraps the text and adapts its height automatically to match the content. The RTF Annotation window is toggled on and off using the J key in FPV Pro. The program remembers the state of this toggle between sessions. There is nothing special to do to display the comment besides popping up the window: the program looks for the special RTF comment automatically and will display it when present. This feature was originally developed for the medical school of the University of Copenhagen, where FastPictureViewer Professional is used as a teaching aid for med school students learning anatomy using specially annotated X-Ray TIFF images containing richly formatted annotations describing the pictures. It can be used to annotate all kinds of images, medical images, images from various science and technical fields such as biology, chemistry, engineering, basically everywhere there is a need to display images accompanied with rich custom annotations. FastPictureViewer defines a custom XMP namespace as follow xmlns:fpv="http://ns.fastpictureviewer.com/fpv/1.0/" This namespace currently supports one element as follow fpv:RichTextComment Below is a snippet that shows the content of an XMP sidecar file containing the above data element in-situ: <?xml version="1.0" encoding="UTF-8"?> <x:xmpmeta xmlns:x="adobe:ns:meta/" x:xmptk="FastPictureViewer 1.6.211.0"> <rdf:RDF xmlns:rdf="http://www.w3.org/1999/02/22-rdf-syntax-ns#"> <rdf:Description rdf:about="" xmlns:fpv="http://ns.fastpictureviewer.com/fpv/1.0/"> <fpv:RichTextComment><![CDATA[{\rtf1 ... RTF Text Goes Here ... }]]></fpv:RichTextComment> </rdf:Description> </rdf:RDF> </x:xmpmeta> The custom namespace avoids any conflict with other existing XMP namespaces, thus Rich Text Comments can be added to any file, either XMP sidecar or embedded XMP data, without creating any problem with other XMP data written by other XMP-enabled applications. All should coexist peacefully. Bellow is a simple example of what can be achieved with this feature:  RTF supports font sizes, font attributes, coloring, spacing, bullet lists and more so it is possible to create appealing and well formatted, rich annotations! Support for embedding and extracting Rich Text Comments as described above has been added to ExifTool 8.91 (many thanks to Phil Harvey), as such comments can be added to most image formats using Phil's excellent metadata editor. For example adding a simple annotation with default formatting can be done as follow (supposing that a file named test.jpg exists in the current folder): exiftool test.jpg -RichTextComment="{\rtf1 Thanks, Phil!!!}" Below is a picture of FastPictureViewer Professional, running on an Apple Mac Pro (!) with Windows installed, displaying an annotated X-ray TIFF image with the custom Rich Text Annotation window shown on the right. This is one of the workstations currently in use at the University of Copenhagen's medical school.  Photo credits: Mads Jespersen, University of Copenhagen |
||||||||||||||
Feature lock-down (for kiosks, schools, public access read-only viewing stations etc)The FastPictureViewer Professional user interface can be partially locked-down using a command-line option. When in locked-down mode the user cannot change the current folder, exit modes
such as auto-advance or the folder tracking mode, full-screen
mode or even exit the program. All functions that change files (rename, delete, rating system etc)
are also disabled as well as all plugged-in
functionality (File Utilities Batch Processor, IPTC Editor, GeoClustering
Utility, Web Publishing, Wallpaper...). It is possible to specify the image folder to browse on the command line as well as a number of other options (display monitor, full-screen, slideshow etc) as well as lock down all "dangerous" or unwanted functionality. Various features, such as for example delete, rename, copy etc can be locked-down selectively. One possible application would be to start the program in borderless full screen and automatic slideshow modes, for example for a display machine. For a full description of the available command-line options please see the FAQ (Does FastPictureViewer supports command-line options?) You can combine the feature lock-down together with the PNG Overlay feature to create for example a branded slideshow or a read-only viewing station. |
||||||||||||||
Regular Expressions in FastPictureViewerRegular expressions are text-matching expression and appears at a couple of places in FastPictureViewer. For example the View Filters feature (F-key) accepts a pattern that the program uses to filter the images by their file name.
Similarly, the File Name condition available in the
Files Utilities plug-in (Ctrl+F key) also accepts file
name patterns. Regular expressions can also be used as
an advanced feature in FastPictureViewer's renaming
templates.
The standard DOS wildcard syntax can be used, with * and ? user as placeholders for any characters, or any single character, respectively. While the DOS wildcard syntax is simple and covers most user's needs for filename matching, FastPictureViewer Professional also offers an alternative, more powerful pattern matching syntax known as Regular Expressions, or regex for short. An entire book would be necessary to fully describe regular expressions and their (admittedly intimidating) syntax. Moreover, regex's comes in several, slightly different flavors so their syntax and behavior changes a bit between variants. On the other hand, regular expression are more powerful than DOS wildcards, for example it would be easy to write a pattern that matches, say, all file names having the digit "5" or "6" in 3rd position, something simple with a regex and impossible with DOS wildcards! The regular expression flavor used in FastPictureViewer is known as ECMAScript Regular Expressions and follows the ECMAScript pattern matching behavior. As a side note, the ECMAScript programming language is a popular web standard better known as JavaScript, JScript or ActionScript, as implemented by nearly all web browsers today. Incidentally, this is the same language that can be used to write custom action and conditions in our Files Utilities plug-in. ECMAScript features a regular expression engine with a well-defined syntax. This same regular expression syntax is used in FPV Pro where it accepts a regular expression. Let's start with a tiny example. For the sake of explanation, lets pretend that we want to match all file names having either a "5" or a "6" in the 3rd position. The example is simple enough, yet it readily illustrate the advantage of regexes over wildcards: more expressive power! The regular expression can look as follow: .{2}[56].* Let's dissect the expression: a single dot matches any arbitrary character or digit ("any symbol"). It is followed by a quantifier, 2, written between curly braces. A character range then follows between square brackets (the range starts at digit 5 and ends at digit 6). Finally another single dot (matching any character) followed by a special quantifier * meaning "zero or more". It reads "two leading symbols, then one of 5 or 6, then zero or more trailing symbol(s)". In effect, this pattern will match any file having either the digit "5" or "6" at the 3rd position in their name. The usefulness of this particular example is left to the appreciation of the reader, but regular expressions known about letters, digits, ranges, and a lot more. With a little patience it's possible to build patterns matching any conceivable file names no matter how complex. Regular expressions allows file selection and renaming in FastPictureViewer going well beyond the abilities offered by DOS wildcards-based systems, for example renaming all the files in the form _ABC1234 to ABC_1234, or simply selecting all file whose names ends with at least 3 digits: .*[\d]{3,} (reading "zero or more symbols followed by at least 3 digits". The reader interested in complex pattern matching and renaming in FastPictureViewer is encouraged to learn more about regular expressions in one of the numerous books on the subject or to read one of the many tutorials available on the web. Once mastered one never looks back at DOS wildcards again!
|
||||||||||||||
External Bookmarks SystemFastPictureViewer features a scalable bookmark system that let users mark any number of images using a named bookmark.
You can press M to mark an image (set an external bookmark on it). Bookmarks are automatically named and numbered. The program ask you how to name them the first time you set a bookmark in a session, then goes on from there by auto-numbering the next bookmarks, so you only need to press M later on. You can change the naming scheme by pressing Ctrl+M. An existing bookmark can be removed by pressing Shift+M. You can navigate to the previous/next bookmark by pressing F7 and F8, respectively. You can display a list of bookmarks in a floating window by pressing the G key, where bookmarks can be deleted, renamed and navigated to using the expected left and right-click mouse commands. External bookmarks are saved in a simple UTF-8 text file named Bookmarks.fpv and stored in the root image folder (thus the "external" name). This system is very scalable, there is no practical limit on the number of bookmarks that can be stored (many thousands bookmarks are OK!). The bookmark file's format is trivial and can easily be created externally, or edited or merged with other bookmark files etc, using a simple text editor like Notepad. The bookmarking system works in parallel with the built-in Quick Bookmarks system, where a numeric bookmark from 0 to 9 can be set on a picture using Ctrl+Alt+n, where n is a digit like 0, 1, 2, 3 etc., then navigated to using Alt+n. Example: Set bookmark 1 by pressing Ctrl+Alt+1, return later by pressing Alt+1 The external bookmarks works similarly, but are not limited to single-digit numbers. The external bookmark feature has been available as part of a special version of FastPictureViewer Pro since mid-2008 and was originally developed for a company dealing with "projects" of 200,000 images and beyond, where FPV Pro was - and still is - the only product on the market able to handle that many images at a time in a single flattened image list, as well as support thousands of bookmarks to quickly jump to any part of the project. The bookmarking feature helped the customer to quickly go back to any previously marked interesting spot within a project. We believe the external bookmark system can be useful to other users too, thus we surfaced this great feature in the standard product available to all registered users. You can use external bookmarks to mark special images in your collection, then jump back to those images using a named bookmark. The bookmark file format is extremely simple and consists only of text, with one bookmark per line. Each line is composed of two parts: first comes the full pathname of the image to bookmark, followed by a semicolon and the name of the bookmark to assign to the image, as follow:
C:\Images\Image001.jpg;Bookmark1 FastPictureViewer reads and interprets the Bookmarks.fpv file very quickly when opening the image folder and matches the bookmarks with the images found in the folder or its subfolders, by comparing the full path names as it discovers the images. After the folders are scanned you can click on any bookmark to jump straight to the image it relates to. Renaming or deleting an image from within FastPictureViewer of course maintains the bookmark list perfectly in-sync, automatically.
|
||||||||||||||
Customer Experience Improvement Program (CEIP) in FastPictureViewerStarting from FastPictureViewer 1.8.254.0 the product includes an
non-mandatory, opt-in "Customer Experience Improvement Program", also known as "telemetry", "software quality metrics" or, lately, as "runtime intelligence", a mechanism which collects
anonymous metrics about feature usage (such as the number of times feature such-and-such was launched) along with some performance data. All major software applications and operating systems includes similar mechanisms, which are key ingredients helping software developers understand how the product is used in the field.
This information gives us the developper better insights in the long run regarding how the program is actually used and how it performs in the field, and will help drive decisions on how to better spend our future development efforts, which part of the product to improve, or which feature does not get the attention it deserve. This is a big step towards raising FastPictureViewer Pro to the "next level", whatever that is... The data collection has no measurable impact on the program's performance. No personal data is recorded. No data outside FastPictureViewer is recorded and no files are accessed during the data collection process: the program just counts the clicks on various buttons and commands, and measure the time it takes to execute certain commands. The data is then aggregated on our side (that is, we consolidate all data from all users together). This aggregated data gives a broad view on feature usage and performance, and will help answer questions such as What is the percentage of users running with hardware acceleration turned on?, or Out of all sessions, how many times the File Utilities plug-in was used?, and many other similar questions. We plan to include more counters in the future, to give answers t more questions, but it will still strictly be to record feature usage and performance metrics. The CEIP is mentioned in clear text in the End User License Agreement. You can disable this mechanism at any time, or chose not to install it in the first place, by running the program's setup and uninstalling/red-crossing the Customer Experience Improvement component. This will remove the part of the product that is responsible for collecting and sending the usage and performance data. This component is entirely optional and FastPictureViewer Pro works identically well with or without it. When the component is not installed, no statistical data is recorded or transmitted in any way or form. There is no name, address, email address, license key or phone number in this data. The recorded data is stored in the registry (under HKCU/Software/ARSD/FastPictureViewer/CEIP) and sent over HTTP about once every two months, when the program exits. There should be no disruption or delay incurred by this mechanism. The data, typically one to two KB in length depending on usage, is sent to http://arsd.cloudapp.net/FPV/Telemetry/ and includes a random identifier created the first time the CEIP feature is installed (not linked to your license number or FPV hardware ID in any way) as well as a checksum used to verify the validity of the transmitted data. The data is sent as a Base64 string, in a custom HTTP header named X-ARSD-Telemetry. CEIP FAQ:How does CEIP work?When you choose to participate in the CEIP, FastPictureViewer Professional automatically sends information to Axel Rietschin Software Developments about how and how often you use certain features. Information from your computer such as the Operating System version is combined with other CEIP data to help Axel Rietschin Software Developments solve problems and to improve the products and features customers use most often. Will CEIP collect information about all products on my computer? No. CEIP collects information about Axel Rietschin Software Developments products as well as limited information about third-party applications that interact directly with Axel Rietschin Software Developments products. For example if FastPictureViewer Pro loads a codec from Canon to open an image, this fact may be recorded. Will I be contacted or receive spam if I participate? No. CEIP reports do not contain contact information, such as your name, address, or phone number. This means CEIP will not ask you to participate in surveys or to read junk e-mail, and you will not be contacted in any other way. Will the program ask me permission before transmitting CEIP data? Yes. Provided that you did not opt-out the CEIP entirely during installation, the program will ask you once for your consent on one of the first launches, but at the latest before any CEIP transmission is made. If you decline the data transmission will never occur. If I choose to participate, can I opt out later? Yes. For any released product with an option to participate in CEIP, you can choose to start or stop participating at any time. Our programs make CEIP options available from the setup customization page: simply uncheck (or recheck) the Customer Experience Improvement Program during installation. Some pre-release products that are under development might require participation in CEIP to help ensure the final release of the product improves frequently used features and solves common problems that exist in the pre-release software. Is the Customer Experience Improvement Program spyware? No. Spyware can collect information or act on your computer without your knowledge or consent. You can choose to start or stop participating to the FPV Pro CEIP at any time and the data collected is strictly confined to FPV Pro usage and performance, as well as direct runtime interactions with other software. No personally identifiable information is ever recorded or sent. Can I review the information before it is sent to Axel Rietschin Software Developments? Unfortunately the information can't be reviewed for the following reasons:
The spirit of the CEIP is to help us better understand how the product is used, with the aim to provide you with an even better product in the future. |
|
Act Now. Download FPV Pro.
Download FastPictureViewer Professional (free, no questions asked trial) and see for yourself how raw image viewing can become fast and enjoyable. |
|